

This tile installation blog is your one stop shop for trade secrets and general information on tile installation. If you are a homeowner and looking to purchase a tile shower, back splash, tile floors - Let us help you not get ripped off. Look into the mind of a Pro tile installer. I’m sure to help any DIY tile person too with videos and photos!
Another excellent tile bathroom in Kennesaw, GA
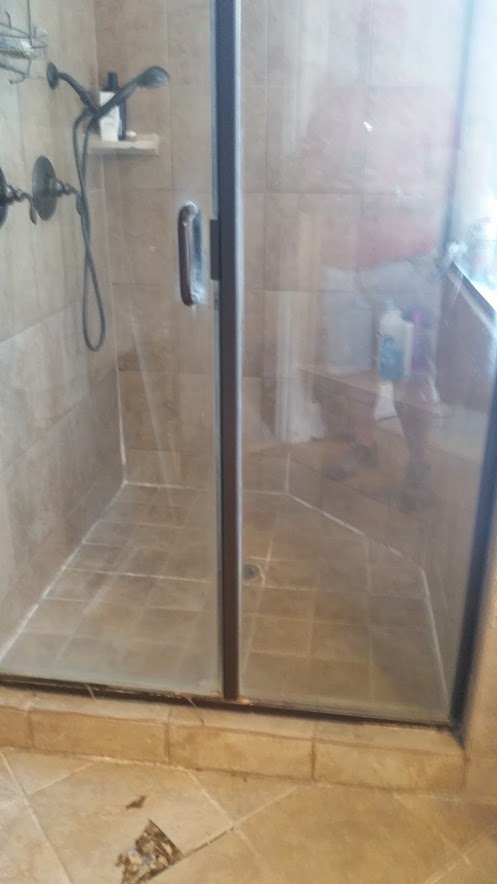
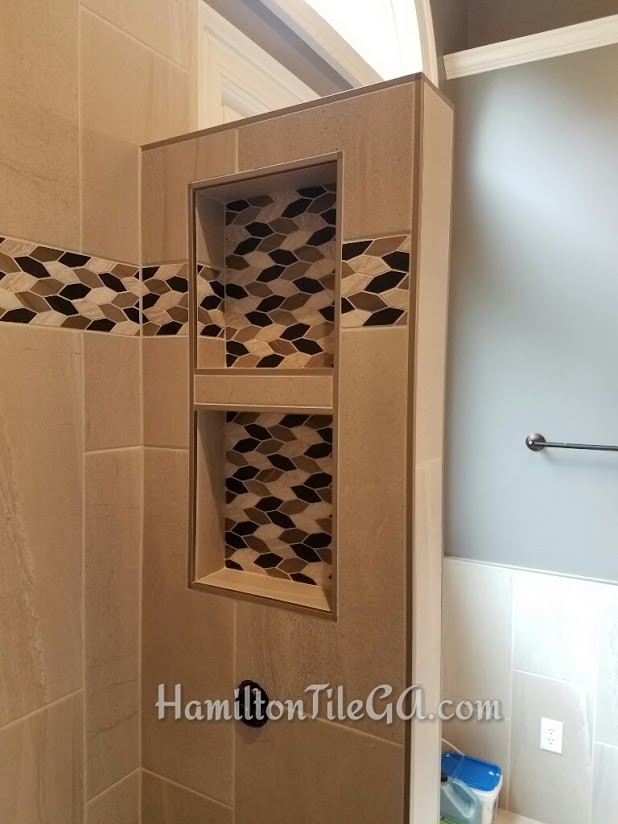
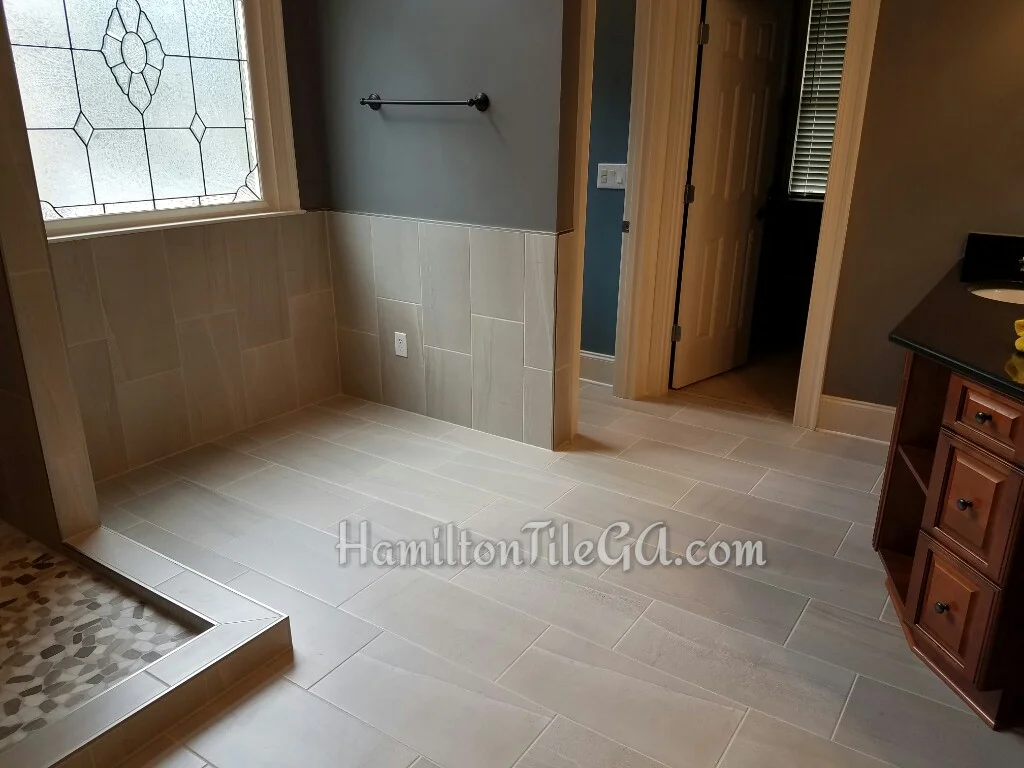
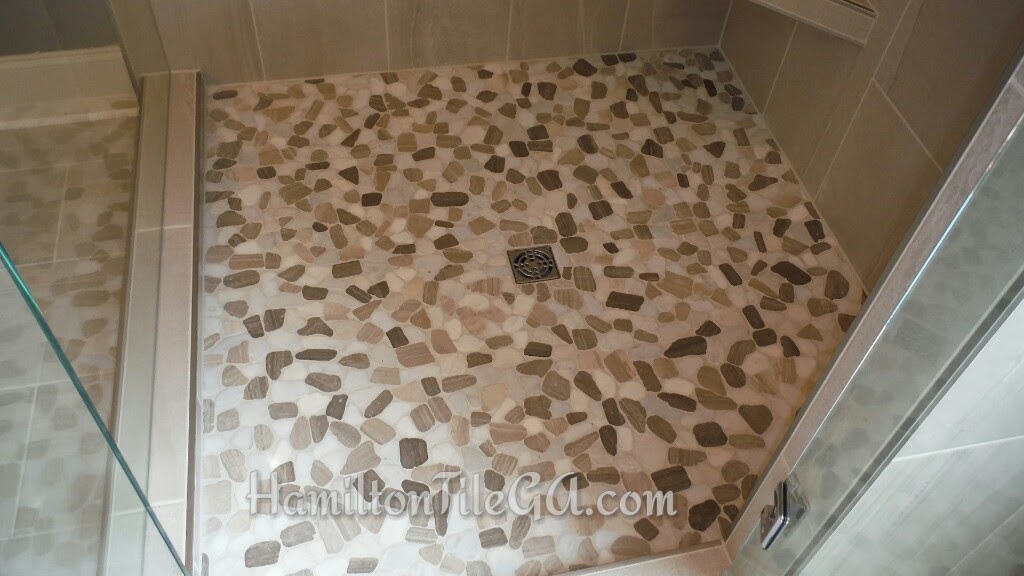
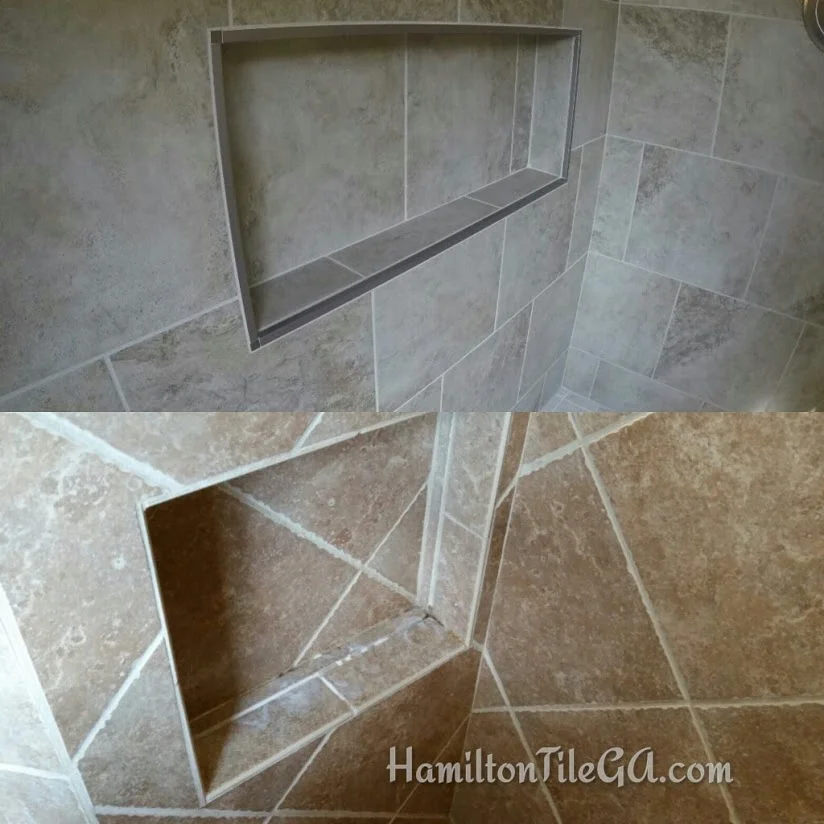
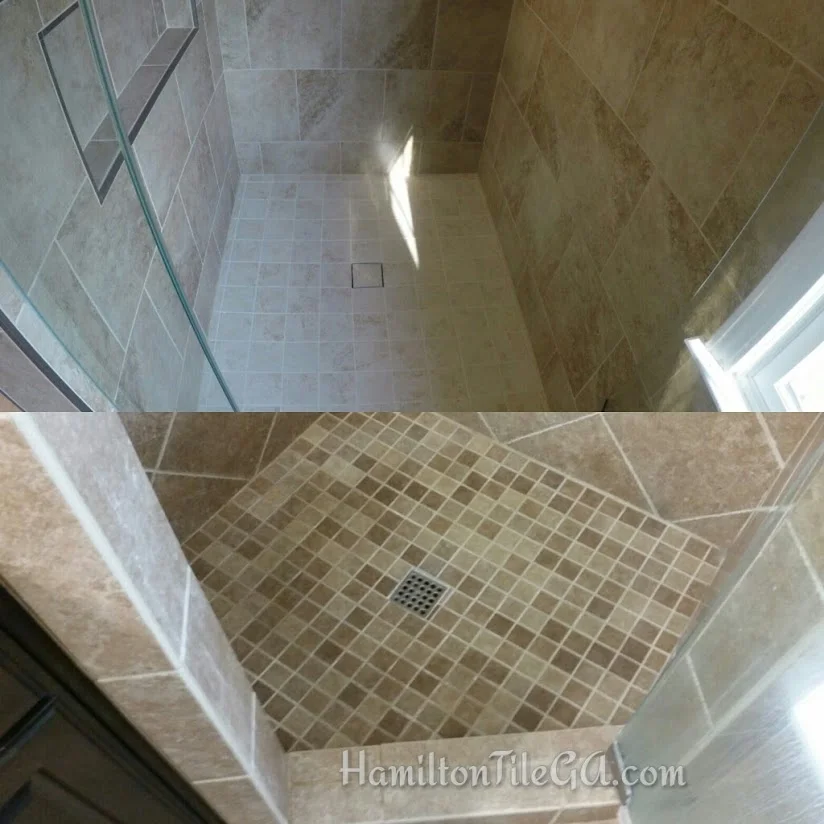
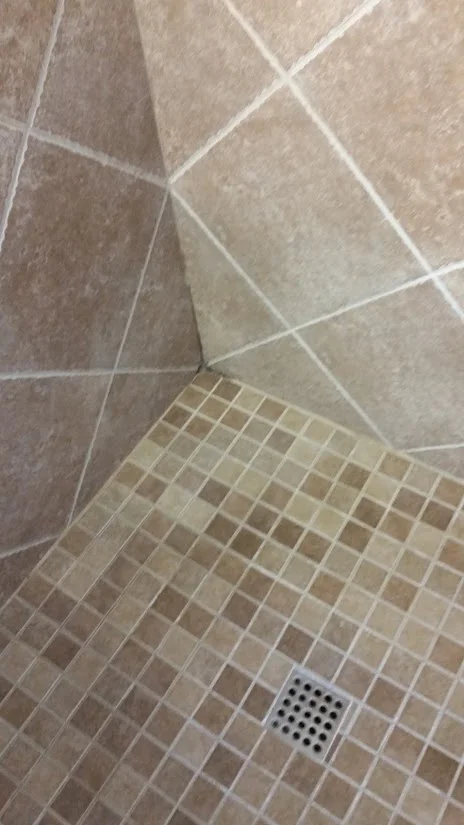
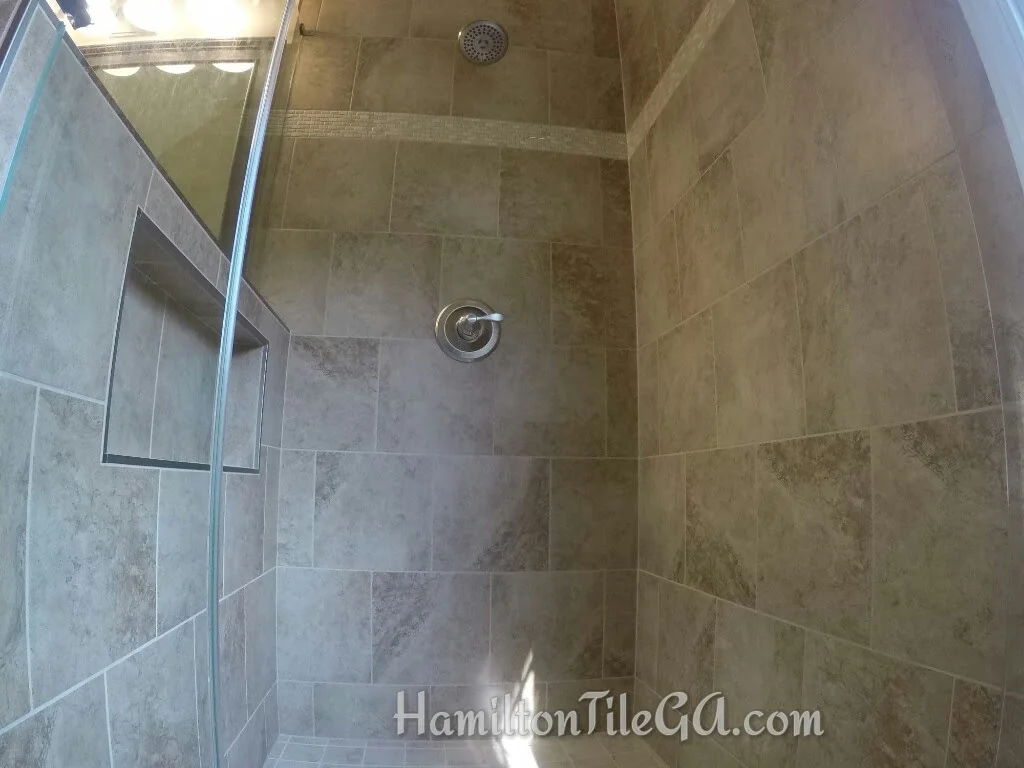
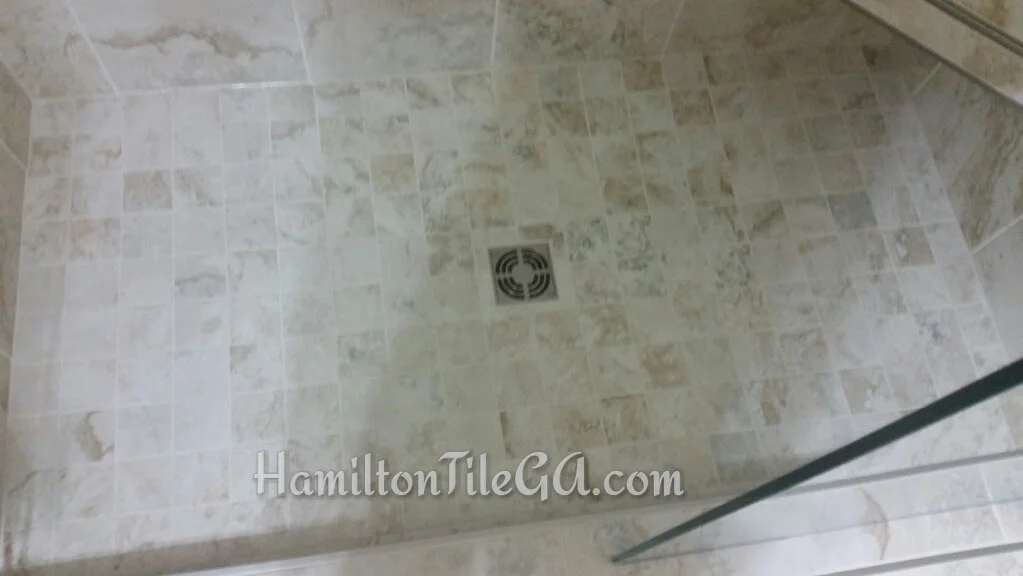
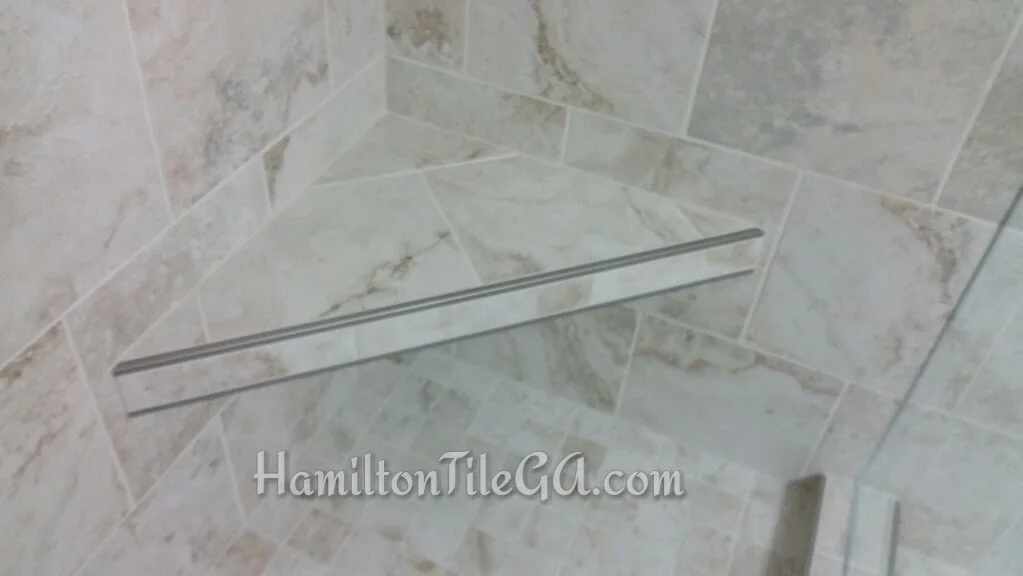
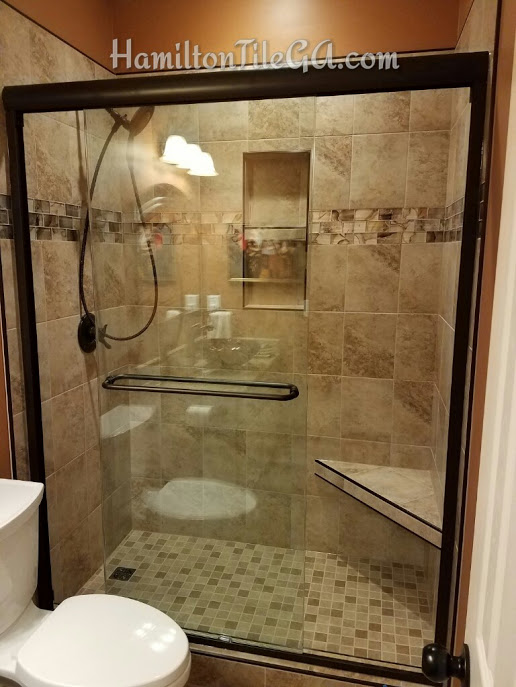
Our latest bathroom remodel in Kennesaw, GA was a real doozy. A dual bathroom remodel in the same house. Incredible clients. High end work and we are very proud of it. The downstairs shower had a tileable linear drain, and we custom made the shower pan tile. VERY large tile inside the shower and Jason was able to make these walls nice and flat for a small grout line and a lip free tile installation. Our plumber really did a great job putting in this large fixture! I love the sleek, cleaning looking soap niche, which really puts a great touch on this shower. Not to mention the natural light from the window, edged with Schluter Quadec profiles. The floor is a 12"x24" tile from Tile House in Marietta. Cindy, again providing excellent design service and consultation for the outstanding owners of this home.


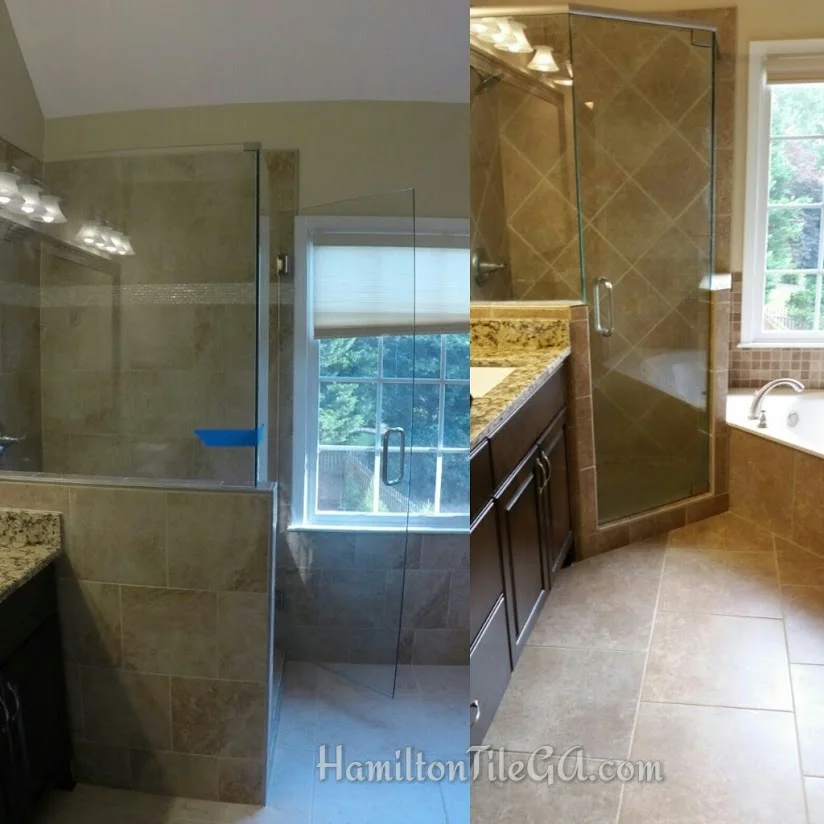
A small improvement! I love the before and after!
A sleek inset box edged with Schluter Quadec profiles.


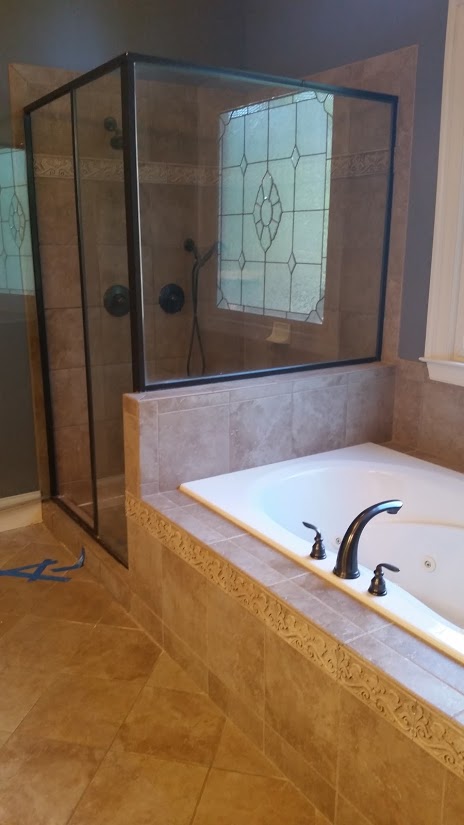
The upstairs bathroom was also a design gem. The bathroom floor was a flat finish 12"x24 porcelain tile that looks like natural stone. To contrast the floor the two inside walls were a gloss 12"x24" porcelain of the same line. What a great detail! The back tub surround wall was a handmade mosaic as an accent! Again, a sleek, large inset box for all their soap needs.
Our plumber also installed this luxury bathtub and we edged the floor with a tile trim topped off with Quadec profiles. Very sharp!
These were a couple of nice jobs for a couple of people that we really enjoy working for. There are more projects in this home that we will be completing and we completed the tile in Bob's daughters house as well.
During the time of this remodel I added a new member to my family. Baby Rosalie Maria Santos was born on September 10th, 2017 and Bob, the owner of this home, made her a great welcome gift that I was so excited and happy to receive. He is an excellent wood worker and quite capable. He is a true artist and the fact that we pleased him with our work really means a lot to us.
Now let me be a proud papa here a little bit....

Baby Rosie.

Look at that cutie!

Look at this incredible train set Bob made me! Homemade gifts are the best. Especially from a talented person!
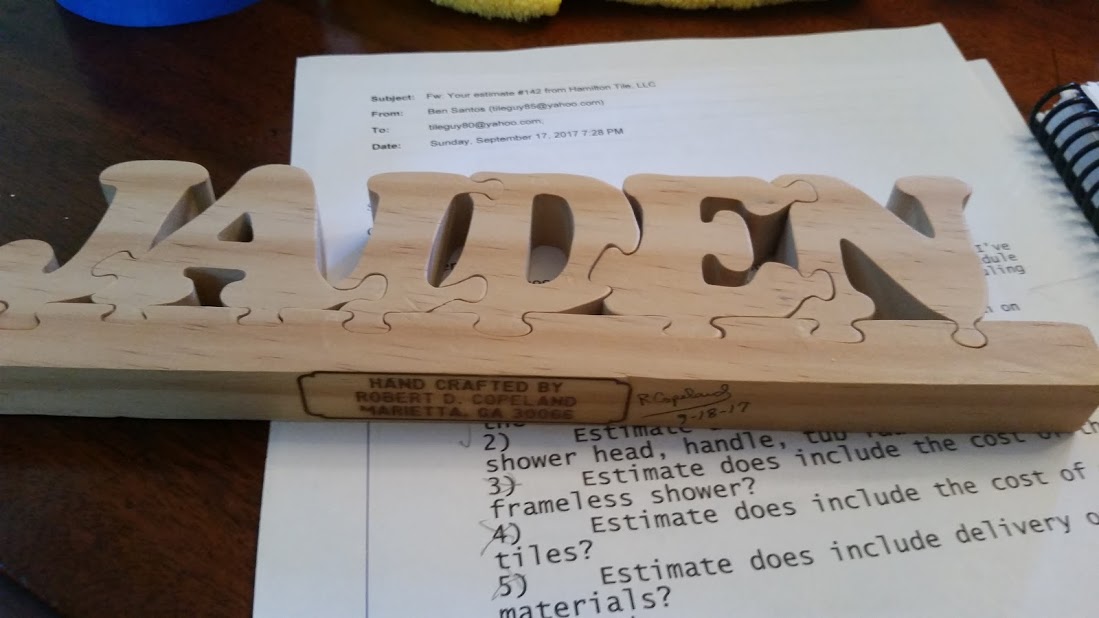
He even made a gift for Jaiden's birthday! His wooden art is incredible as well!
Call us today for a superior bathroom remodeling experience. You will be happy you did!
An East Cobb bathroom remodel coming together for the finish.
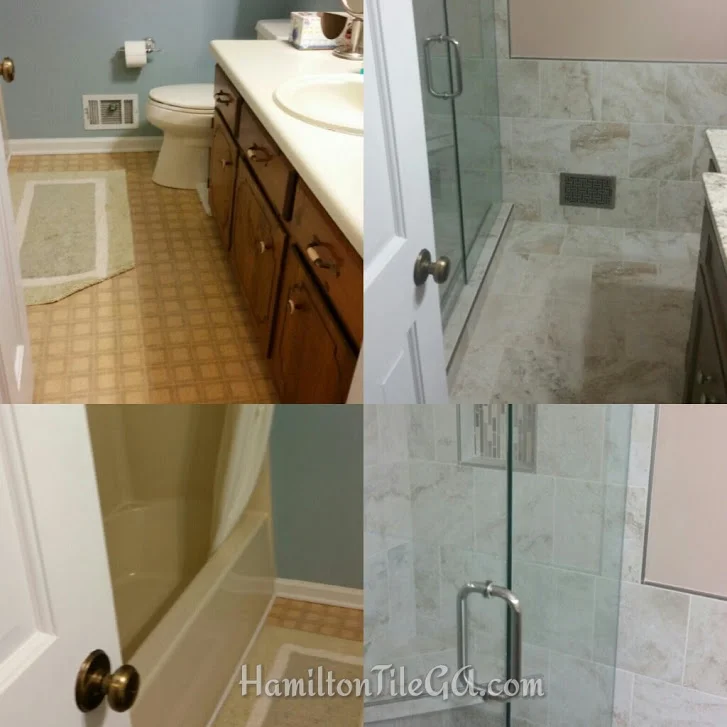
This is a wonderful job filled with natural stone tile work in East Cobb, GA. My client Anne was certainly a design centered client who wanted a high end finished product. Again, a homeowner who was cautious about who she hired due to a history of backwards, basic, minimum standard workers who would leave her high and dry with a finished product she didn't love. So, Hamilton Tile came in and gave her what she deserved and left her feeling like she made the right decision.
We start with the guest bath floor which was a real gem. There was an extreme amount of prep to get this floor flat enough for a large format tile. It dropped two feet in front of the tub by as much as a 1/2". What a caddy wampus setup! Again, workers during new construction casting aside all the rules and putting something together that workers in the future would curse them for! (under my breath of course)
We went in with a 12x24 natural stone tile, 1/3rd offset with a small grout joint. With tile trim around the perimeter. We used silicone to caulk all of the plane changes, (wall to floor, tub to floor) and a high grade Prizm grout. (oyster grey.) We went ahead and sealed it for good measure! Of course there is carpet in the other room, so an important factor with a tile install is, will your tile installer unite the carpet with the new tile? It's an important question to ask because not all tile installers will. It requires that we put on our carpet guy hat, bust out the carpet kicker, carpet trimmer and tack strip and go to town. It's all about the details and putting the carpet back together is what we mean when we say "full service."

After I had completed the floor, Anne alerted me that I did a great job by offering me another job in the same bathroom. She wanted some artisan tile work done around the mirror. This job was a bit more complex because it required extensive consultation and planning. This part of a tile job is what we pride ourselves on. The fact that you can sit down with us, tell us what you want and we can verbalize the pros and cons and what to watch out for is invaluable. We decided how the artisan tile would install around the mirror, discussed the positioning of the mirror, managed expectations, laid everything out and after the mirror was installed we put the tile up. It really turned out great making this area really stand out.

As you can see, our portfolio is constantly growing, which signals the fact that we are a business that is consistent, conscientious and customer service focused. Be sure to check out the Five Star review of this project on our Google review profile and I wish you calm seas on your next remodeling project.
Our latest tile tub surround in Woodstock, GA.
Here we are again, going above industry standards to create a product that combines Looks, Longevity, and Functionality. With all our projects we make it a point never to cut a corner. NOT ONE. Why you ask? We're not in this business for short term gain.
"There's hardly anything in this world that a man can't make a little worse and sell a little cheaper & the people who consider price only are this man's lawful prey" - John Ruskin
With every job we are lucky enough to perform, we use methods that have been tested to ensure a lifetime installation and a product our clients will be happy with forever. That's what tile is...A forever product. That is, if it is installed correctly. Anyone, and I mean anyone, can make tile LOOK decent, but to have something that will last the lifetime of your home (the whole POINT of tile) you need a conscientious, meticulous, intelligent installer that cares about the rule book.
On this bathroom remodel, we water proofed the inside of the tub surround, which isn't actually required and most tile guys don't, but we go the extra mile. Will your contractor? We back buttered every tile to ensure complete coverage and support and to also ensure there will be no cracked or moving tile five years down the road. We used high end thin set and high end grout. Our inset decorative band is flush with the outside tile. We used updated Kerdi Profiles for edging so this bathroom will look current 20 years from now instead of dated bull nose. We honored expansion joints in the concrete accord to standards in the ANSI manual. We used full silicone caulk inside the shower at all plane changes (corners, tub to tile) which is highly uncommon in the trade. Silicone, because latex caulk is NOT RATED for a wet area. Is your contractor doing that? Finally, we brought the tile all the way to the ceiling instead of doing what most do and ending the tile a foot below the ceiling to save $25 dollars.
This is a group of about ten details which make this a superior tile job. Details in general is what differentiates a great job from a so/so job. Ten details ignored makes for a project that will give you as a homeowner a problem.
Look at your contractor and ask yourself, Is this a man (or woman) who will perform the extra step for me?

Jason, the fearless leader, displaying a beautiful back splash in the same basement wearing our HamiltonTileGA.com shirts. Fresh from the press!

Separating our company from the pack.
In recent days the opportunity to advance into certified tile installer status came upon us when Tile Shop, in Kennasaw , GA allowed local tile guys to use their warehouse to become certified Tile installers. The CTEF (Ceramic Tile Education Foundation) puts on an extensive hands on test, physically verifying installers using skills and validates that they are performing industry standards. You are given directions and materials and told to build a timed test project...each installer's work is individually graded by the CTEF's evaluator. This is the most difficult 25sqft any installer will ever set. They also have a 155 question written test based upon NTCA and ANSI standards. Jason Hamilton was able to pass and become one of 1300 Certified Tile installers in the country. A very big accomplishment and a proud moment for any legitimate tile guy.

After 20 years in the industry Jason says having his certification is one of the most gratifying accomplishments of his long career.
Another achievement that separates Hamilton Tile from the pack & speaks to Jason's overall proficiency in his field.
Be sure to ask your potential tile guy, are you a Certified Tile Installer??? I am proud to display this badge!

Our latest finished tile bathrooms around the Atlanta area.
We have been very busy lately!. There is no doubt we are finishers, taking these projects from ideas to reality.

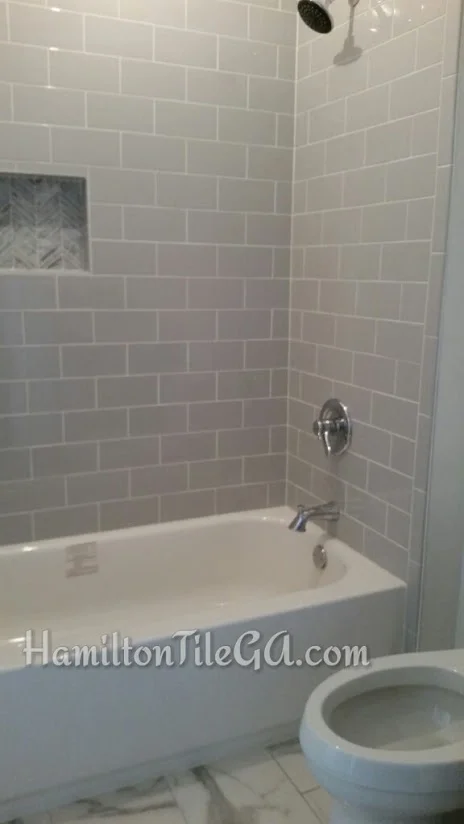
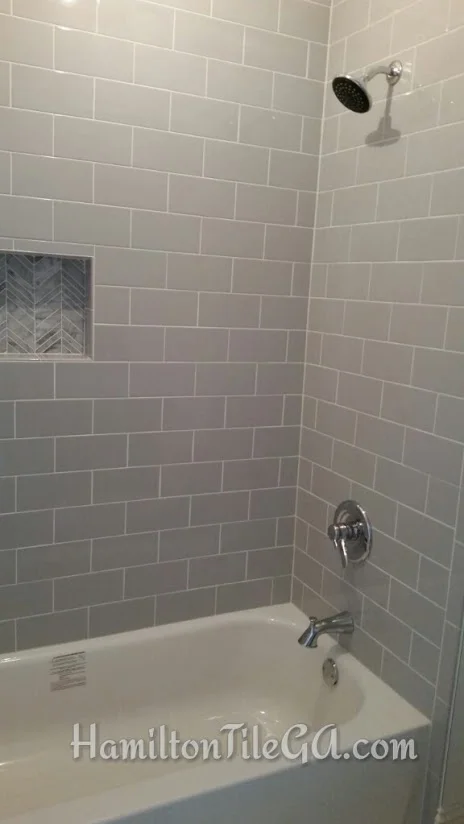
This tub surround is an interesting piece in Sandy Springs, GA. I like this one because it takes a traditional subway tile, but instead of white, they decided to go with gray. The floor in this area are 12"x24" porcelain tile. Looks a lot like natural stone though, doesn't it? That's the beauty...the look of natural stone...without the maintenance!

This full tile shower in Sandy Springs, GA was a very interesting project. It has traditional slate tile on the floor, which isn't my favorite to work with...actually I despise it because of the different thickness, sizes and variation in the tile, but let's face it....I'm not paid for my opinion. Let me say this...When you're a person like me who goes for flat, and smooth to the touch when installing tile....a slate project makes for a frustrating day.
Inside the shower was a 4"x4" white subway brick set with kerdi bar edging. They added a corner bench and Fusion pro single component grout for a maintenance free install. Only an interior designer could come up with a combination like this! Visit her website at www.heatherfulkersoninteriors.com.

This tile tub surround is in Johns Creek, GA and these folks were going all out renovating the inside and outside of their home. Simple subway tile tub surround. All the way to the ceiling with the tile to show we are serious.

Milton, GA bathroom tile shower remodel.
This tile tub surround was located in Milton, GA. I really enjoyed installing this Arabesque floor and I was very happy with how it turned out. This tile was purchased from Floor and Décor which can be hit or miss, but the arabesque tile was packaged so meticulously, it was a breeze to install. A word about mosaics, the storage and shipping of this type of tile is of the utmost importance. Having it stored flat, and packaged securely (temperature controlled) makes it so the tile (which is glued to a mesh) does not get distorted which makes the sheets impossible to fit together with consistent grout lines. This stuff was packed on cardboard and wrapped in plastic and it even had directions and manufacturer information on the package. This is outside the character of floor and décor, but I like it!
Simple 3"x6" tile on the walls...again up to the ceiling to signal saving $20 isn't more important than producing a high end finished product.

Finally this natural stone center piece in Roswell, GA. This one was a designer piece with Hexagon tiles on the floor. I went off a drawing on this one and brought it in for the win. We have a natural stone on the walls brick set as well. A little bit more money put into this install but a stone product really screams wealth, prosperity and most importantly longevity.
Does your installer use 'The Handbook method'?

Over the last couple weeks we at Hamilton Tile have been studying for our Certified Tile Installer test. It's really tough! All this studying has left me motivated to write a little bit about different mind sets in the tile game.
Many tile installers that I see out there fly by the seat of their pants. You ask them why they do things a certain way and they'll say "Well, this is how we've always done it." Or we'll watch them work and shake our heads knowing that they are doing things incorrectly. Often times the most ignorant are the most confident in their position. (look up Dunning-Kruger effect) Ultimately it's no use even correcting them.
So what separates Hamilton Tile from the tiling drones?
We use the 'Handbook Method'
The 'Handbook Method' is an installation method that goes through an application and approval process by engineers and installers far smarter than we are. This approval process makes sure that the installation methods are tried and true. There are rigorous requirements for an installation technique to get into the 400+ page TCNA handbook. Following the handbook ensures a lasting tile installation, which is the most important part of tile and why you chose tile in the first place! We follow this book and do not deviate from it no matter how much a prospective client wants us to...and often times we pass on jobs because of this principled mindset...where the next guy would say "just doing what I'm told for the sake of working" NOT how you have a long term business and happy customers.
TCNA Handbook method requirements include:
Method is generic and products are available from more than one manufacturer.
All materials have been available nationally for more than 3 years.
The system is warranted by the manufacturers of the materials for recommended uses.
Meets applicable testing requirements
Handbook committee approves the methods.
Following the Handbook method is extremely important because you can be assured you're project is not being installed according to a whim. "Oh, this is how I feel like doing this today." or "This is how we've ALWAYS done it" (The kiss of death!)
I encourage you to ask your installer if he uses the 'Handbook method'...It's not an end all be all, but its a great way to tell if an installer respects industry norms and standards. If the installer doesn't know what you're talking about, I would recommend moving on.
If you are looking for a skilled installer visit: WWW.tile-assn.com or CeramicTileFoundation.org type in your zip code and they will direct you to someone who is a member and you'll be guaranteed someone who has achieved expert status in the tiling trade.
The best bathroom remodel in Marietta, GA

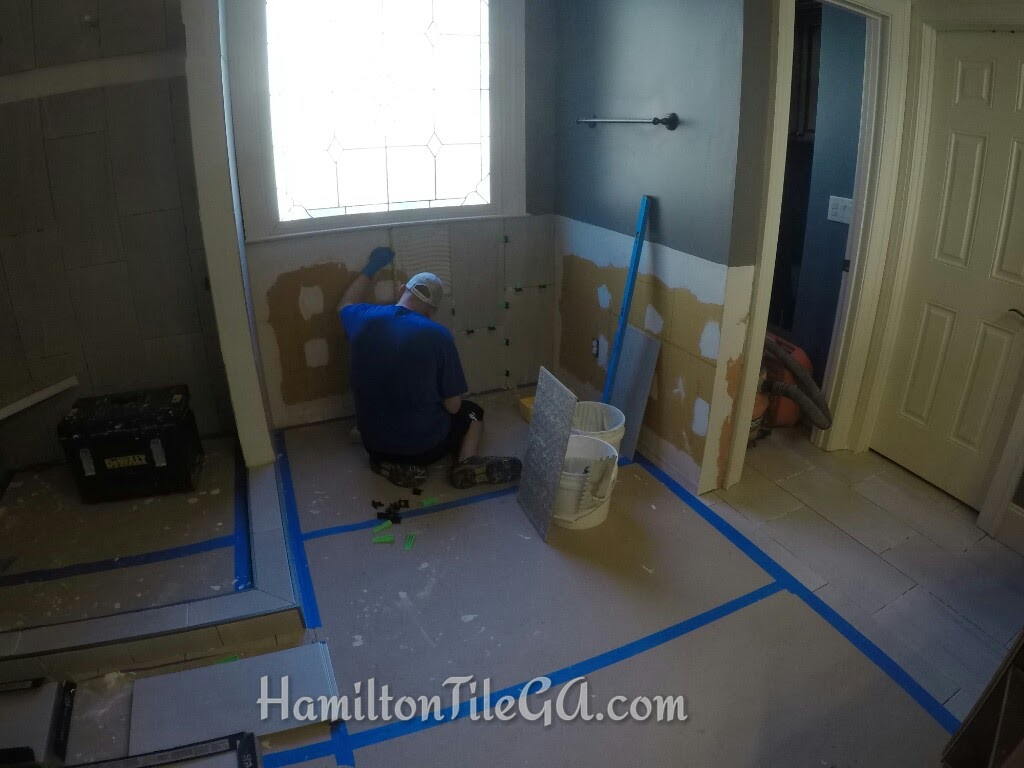
Back again with another tile update from Hamilton Tile! This bathroom for the Mayhew's in Marietta, GA was a tile emergency. Their previous shower was built so incorrectly it leaked to the point of rotting out their house. The old shower was your basic, builder grade, minimum standard, blowout special that we see so often:


So, looking at the photos can you understand why I'm so hard on builders? This is why when you find a good builder you should keep him around. It's not as if they don't know that a shower has to be water proof, a shower sees more water per year than your roof...A LOT MORE. Shoddy building all over Atlanta creates a living for us, but this degree of obsolescence is unethical. Many builders are just plain shady. There I said it! This is why I put this information out there, because ultimately when hiring a contractor you have to watch out for yourself! If the price seems to low, it probably is. If your contractor can't tell you why he does things, he probably doesn't know. If he doesn't cite ANSI or TCNA standards...He probably doesn't care and he's making it up as he goes..

This shower leaked enough to rot out this engineered beam. It could have been much much worse than this. We ended up doing some creative framing and plating the beam with 2x10's. You can see the mold and the damage this improperly built shower perpetrated. It had no pre-slope and the tile was set directly to sheet rock. It was a real GEM!
Nothing we couldn't handle:
In this video we get to putting things back together....Not below standard, or minimum standards...but LIFETIME standards. Schluter Systems, Trade school graduate, 20+ years experience.
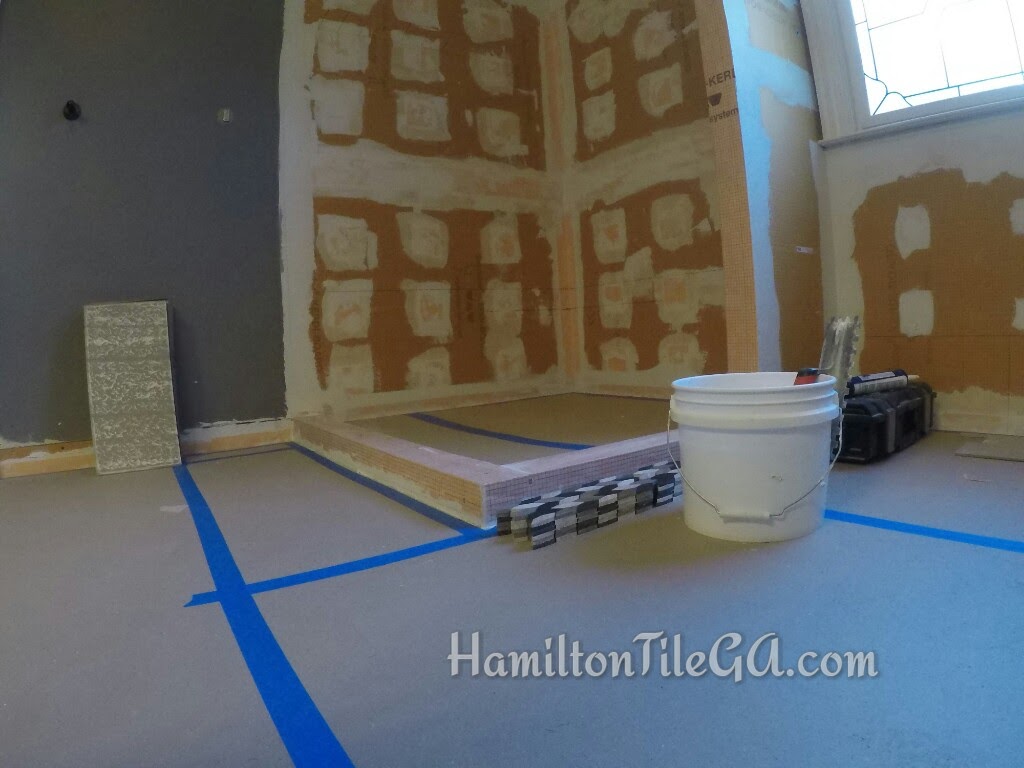
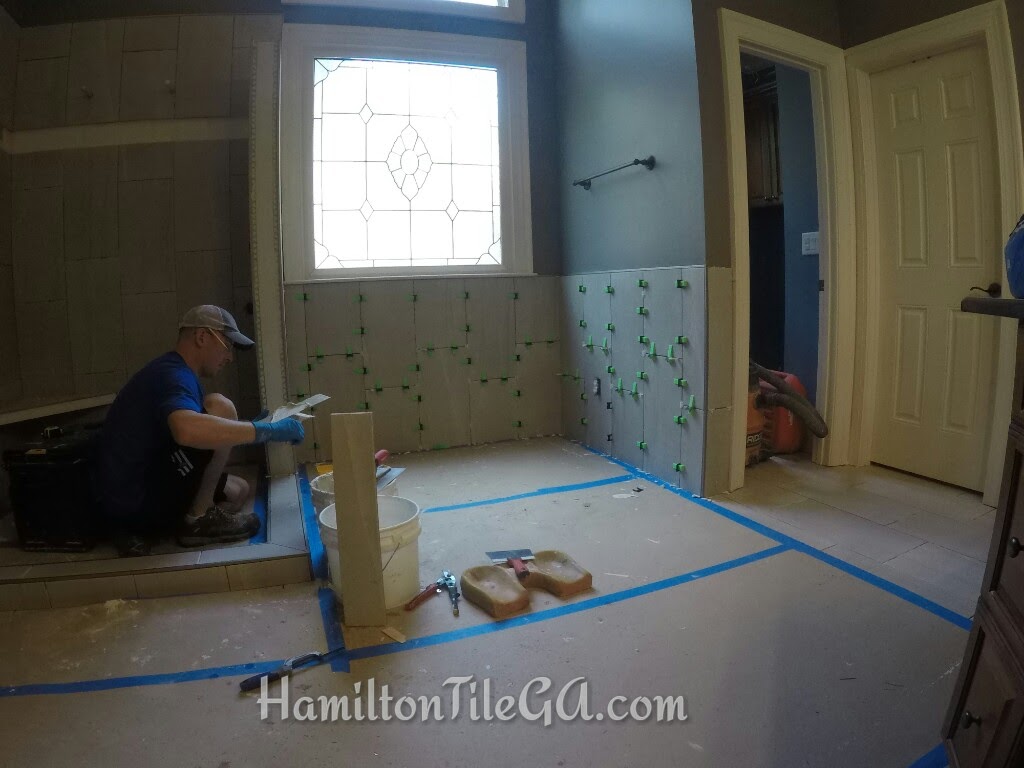
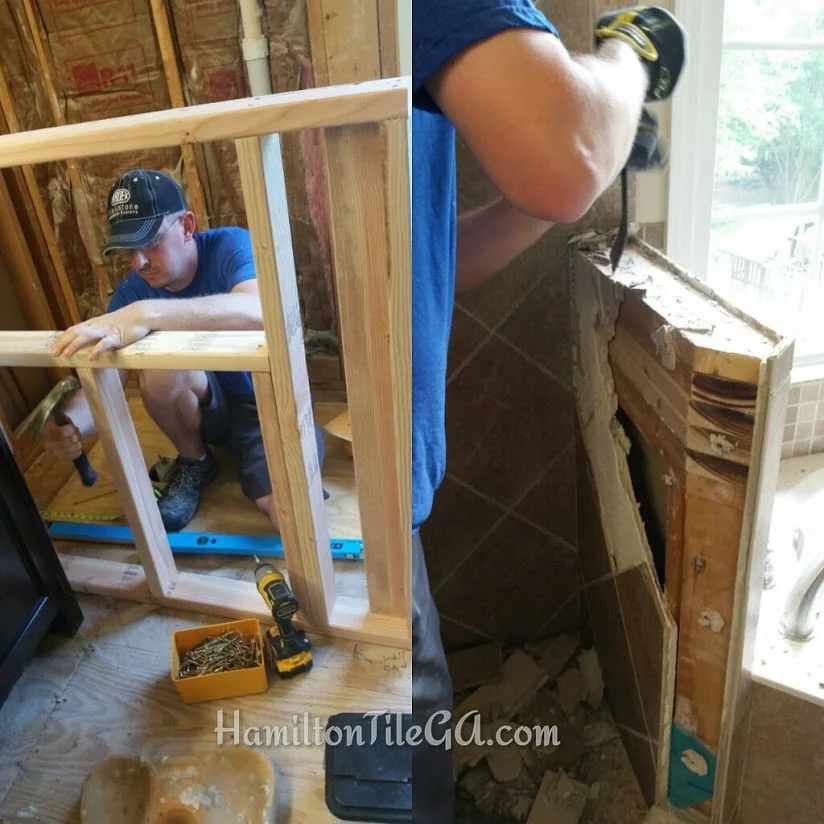
We ended up eliminating the tub and building a wall for the fixtures. Notice the cleanliness, getting a high end finished product starts with the basics that we learned in shop class. Keep your space clean and organized, that way your customer is happy and you get to keep all your fingers and toes because you're going to have an accident free job.

I see many of the 'pros' using ledger boards for their first row...Here's a note, If you're pan is level all the way around from the start...you don't have to cut your bottom row of tile. They all go up the same size all the way around.

Using a leveling system for large format helps get a lip free install! The leveling system is the green wedges you see in the photo. You embed a clip in the thin set under the tile and insert a wedge to pull everything flat.


A big difference from start to finish. This was a rewarding job for us not only because we're pursuing a passion but because we got to work with people that were invested more than monetarily in their project. We had done work in this house previously and from the start of this job the Mayhew's were involved and excited. Just the fact that they visited this website makes all the work I do on it worth it. Some guys dread working around intrigued clients, mostly because their work is not above board. We love the engineer types because they care as much as we do which adds a whole other level of satisfaction. Like we always say: "If you care about how your project is built, WE WANT TO WORK FOR YOU!" Thanks to the Mayhew's for having us.
Be sure to check out the positive review:
Hamilton Tile Google Review
Hamilton Tile Houzz Review
Be sure to check out my process video!
New to video making, but it adds a new wrinkle so you can really get a taste of what we do. I'm sure the hundredth one will be ready for Sundance. As Scott Adams says, it pays to have a good talent stack and videos are now just another piece to the puzzle. Enjoy!
Our latest Houzz review.
Our newest 5 star Houzz review. Click the link to learn more.
-Our Newest Houzz Review -
Vlog entry: Schluter Quadec Profile Edging.
We regularly get questions regarding Schluter profiles and what they look like. I made this video so you can get a video over view of what to expect if you decide to go with Profiles to edge your tile. Profiles are a great option if you are updating your bathrooms!
We are now on Houzz!
Hello everyone. Just wanted to quickly announce that we are now using Houzz. My reasoning for using this service is that it may be a great way to get us in touch with a design oriented crowd. This site is a great way to display our work and let people know what we are all about and also what we are capable of.
When signing up they give you a custom website so I thought I'd post that below.
Hamilton Tile- Woodstock, GA Houzz Profile. - Click the link!
We would very much like for you to leave a positive review if you've used us before. Visit our site below...
Hamilton Tile - Leave a review - Check out our work.
Click the Link!

Another stunning bathroom remodel in Milton, GA

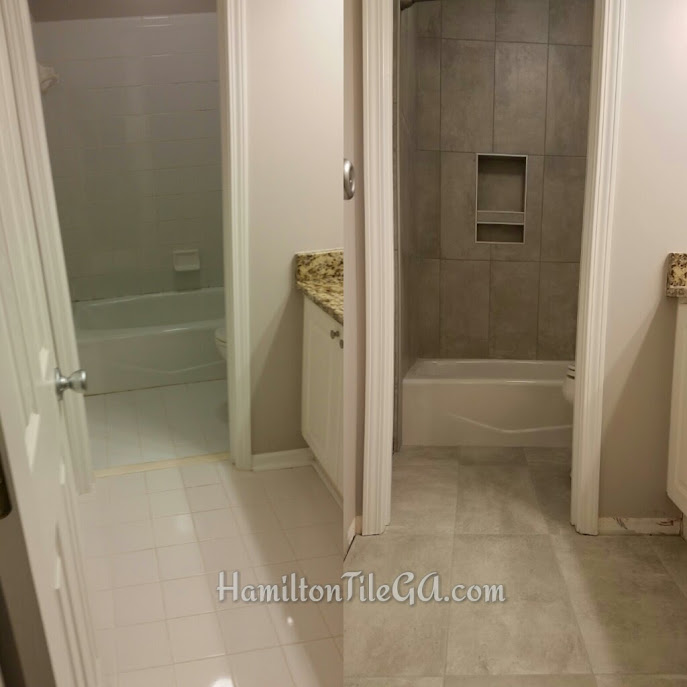
In our latest bathroom remodel, we finished up the third bathroom in this home. It was in dire need of an update due to a shabby pre-sale remodel. It is common for a homeowner who is looking to sell to re-do their master bathroom pre-sale . Of course they don't want to pay very much or take any interest in the project because they won't be staying so, they usually get a pretty horrible job. This bathroom fit right in to that description.
In this blog post I have pretty extensive before and after shots for you to enjoy. I love this blog post because you get a real sense of what the difference is between what we do and a builder grade, basic yes- man tile job.
Let the viewing fun begin:
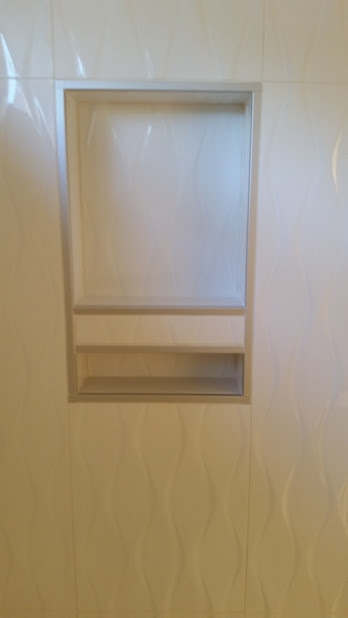
Most people never use their whirlpool tub and the homeowner decided to eliminate it entirely. We made a large drying area for them to use.
Here we have our inset box vs. the competition.
The previous shower floor was a real gem. It had a crooked drain. Bullnose curb with a few grout lines to collect dirt, and a pan that wasn't draining properly because there was no pre slope.
The above photo sums up the difference between us and the competition in a nutshell. The framing on the right....Six 2x4's stacked on top of each other to attain their wall height. The photo on the left, plotted, planned and executed with a mastery developed in a four year trade school.
Notice the corner of this shower, which was entirely built with hardie backer board with absolutely NO waterproofing. This shower was a swamp.

We ended up getting them set up correctly, with a full Schluter Shower with Quadec profiles and a tileable drain. This will never mold, mildew or leak. Notice our curbs are solid pieces with limited grout lines. Chattahooche Glass doors did a great job. Notice NO penetrations in the shower curb, so no worries of leaks!
Our plumbing fixtures are actually SECURED. I can't tell you how many jobs we see that the plumbers simply don't even bother to secure the plumbing fixtures so they are just flopping in the stud bay, ready to cause a leak. A good bathroom remodel is many details added up!
Please take some time to watch the videos below. The first video is a prep video for this bathroom. How many companies are posting videos of what is UNDER their tile work?
And of course the Five Star review:
“We have used Jason Hamilton of Hamilton Tile, LLC to redesign and update 3 different bathrooms in our house. Nothing speaks more highly than using the same company over-and-over-and-over again. We were initially introduced to Jason in 2016 and he immediately established a level of professionalism and attentiveness that is often hard to find. He recently completed our last bathroom update in July 2017. During each project he showed consistency in the amount of time and effort spent during the upfront planning process to provide alternative ideas and suggestions that helped us land on a design and style that met our requirements, as well as, our budget. The installation was done with great care and Jason takes the proper time to ensure that the installation is done correctly. I strongly endorse Hamilton Tile, LLC and I highly recommend them to remodel any size / complexity of bathroom. “
Finally, we have a full walk through with commentary. Every bathroom we build is a point of pride and we put our brand name on each one! Every job is an audition. Let us SHOW you the Hamilton Tile difference...
Happy 4th of July
Happy fourth of July from your local tile guys. We are today thinking of our ancestors and the suffering they endured so we could live comfortably as well as all the things our nation has done for the advancement of the human race. I am looking to the future in the hope we can continue to build on a legacy of prosperity and principle. With our country under unprecedented attack from within, we hope for a renewed strength to battle division and decay.
God Bless America!

A nice tub surround.
Ben put this tub surround together last week. Hamilton Tile is working overtime this summer!
Large format 12x24 porcelain on the floor. Looks alot like natural stone for half the price!
Silicone caulking and Custom Prism grout.

You need a spot to put your soap! How bout a custom inset box?
6 ways to save money on your next bathroom remodel.

In a world full of difficult realities, the potential exorbitant cost of a bathroom remodel is certainly one of them. Often times a leaky shower or a recently handicapped loved one makes a bathroom remodel an unexpected bill. In that situation people will ask..."How can I lower the cost of this tile remodeling project?"
- Do the demolition of the old bathroom yourself. - A bathroom demolition is something able bodied people with limited tools can do themselves and save a lot of money. The average demolition starts at around $1000 dollars. It requires us to wear respirators for most of the day, work around shmeg from years of use and work ourselves to the bone with sharp and heavy material...we have to do dust control and transporting the waste is a drag... you're guaranteed a nail in your tire visiting the dump. With that being said, if you are willing to put a little sweat equity into your house you can retain those dollars by suffering through your own tear out. Hey, make it a family project. Have a teenage son? Put him to work for the weekend and teach him about manual labor and why he should strive for the highest grades possible!
- Stay within the original layout of the existing bathroom. - When you start getting into moving walls and plumbing things get pricey. If you can live with your existing bathroom layout, a bathroom remodel becomes a lot simpler. Anytime you get a licensed plumber involved the bill gets weighty. Moving plumbing, demoing and rebuilding walls, moving electrical and windows adds time to your project, so prepare to add some zeros to the check.
- Keep your tile selection and layout simple. - When making your tile selection, chose smaller tile ---12"x12" for example lessens the technicality of a project. Think...Large Format Tile (any tile with a side bigger then 15") = $$$..Why, you ask? Not only is large format tile more expensive a square foot but also large tile requires a more exact hand during installation. Your installer may have to use a leveling system and your substrate (walls and floors) have to be flat and true in order to get a lip free installation. My favorite low cost tile selection is subway tile. It's a timeless classic that will never go out of style and the square footage cost is very reasonable. Also, any tile guy who knows his stuff will charge extra for soap niches, decorative bands, linear drains, heated floors, corner benches, and technical patterns (herring bone for example)so keep it simple. An example of simple would be straight set 12"x12" with corner shelves. That is a base model shower. When making decisions on layout and design of a bathroom a good way to think is this, if it seems like more work, it will be more money.
- Buy/pick up your own tile - If you have the ability to pickup your own tile and deliver it to the site, it will save you hundreds. Many tile companies will mark up your tile and charge you to pick it up. Sometimes if you go to the tile store yourself and ask, they will be kind enough to give you builder pricing. I've seen this happen a couple times before. I warn you though, Once you handle a couple boxes of tile you will understand why we charge you a handling fee. Bring your back brace, your knee support and get the ice and Epsom salt bath ready. Handling tile is not for the faint of heart (or mind!)
- Make yourself easy to work for- We had a customer recently that was as close to the ideal customer and I could tell, so his bill reflected that. He was extremely flexible with scheduling, he had his work site prepared for us to work, moved his cars out of the garage for our tools and the materials, offered me water and lunch, did his research, was easy to communicate with and paid as work was completed....just a joy to work for! Let's face it...Every company has a 'hassle' charge. A difficult customer always makes a job harder than it has to be so give off the perception of ease. Run through this logic...if YOU are more work, you pay more money.
- Find a company that is truly quality oriented. - I always tell our clients that although our proposal may be higher than the next crew, we are the least expensive company because you will only have to do the job once. I have seen too many jobs to count that people have to pay for twice because the original install wasn't up to snuff. That is definitely not a way to save money. Do your research...Have your installer show you pictures, do they have a site like mine that shows the building process with CURRENT photos? Do they strike you as meticulous, diligent, conscientious people? How do they water proof and do they mention how important prep is to them? Are you using a big company? Do you get to meet the people who will actually be building your project? What are their reviews like from other customers and are they part of any clubs or members of any trade groups? Don't just go by what people say, go by their track record and what they do.
It's okay if you want to go crazy on your next master bathroom. Nothing is more timeless then high end tile work. Just know that high end tile work comes at a high end cost and that tile is ultimately a luxury. By using these six techniques you can save a considerable amount of money on your next remodeling project.
Learn the Installer advantages of using Schluter Systems.

Looking around the tile supply store and seeing people loading up cement board, pan liners, and a plethora of different cement products, I always wonder why they chose to build their projects in such a way when there is a better method. Ah...to be a mind reader! In this blog post I will state my case for why Schluter Systems is by far the best, from an installers perspective.
- A factory 10 year warranty on all water proofing - Lifetime if you use Schluter thin set. What an advantage to work with a company that stands behind their products. This is a real selling point because with most installers your warranty ends when they pull out of your driveway. (It's called the tail-light warranty!)
- All expenses paid training courses. - Schluter puts you up, serves you food and teaches you the proper installation steps. Their training courses are second to none and they realize that it is in their best interest to make sure their installers know what they're doing. Schluter understands the importance of STANDARDIZATION. Similarly to how the Tile Council of North America standardizes tile installation techniques, Schluter Systems standardizes waterproofing so, everyone who uses their line of products basically installs them the same way. Shower building techniques in the industry are as varied as the rainbow, everyone doing things their own way... but not when you use Schluter products... your customer can rest assured that they'll get a functional tile project that will last the lifetime of their home and they won't be just taking your word for it.
- Lightweight products - anytime you can take weight off of your homes structure, it's a great thing! When you use cement products the amount of weight you have to wrestle around is extreme. Tile work is already hard enough! I cannot stress enough the huge amount of weight involved with building a shower in the traditional method. When we put down underlayment instead of dragging around 1000lbs of cement board, we have a roll of plastic Ditra that I can throw on my shoulder. Instead of wrestling with floating walls with cement, I can carry foam Kerdi board with one hand. It's a no brainer. Why tear up your body when you can extend your working career by relying on a strong company.
- Dust free installation - When using cement board and concrete products you're inherently dealing with a bunch of dust. I cut my Kerdi board and Ditra with a razor knife. When working in someone's finished house, I'm not carrying gritty cement board around potentially dinging up walls....I'm carrying light weight and impact free foam boards and membranes. No reason to breath in more dust then absolutely necessary and with the new EPA silica rules, Schluter eliminates a bunch of the dust producers!
- Ease of installation - When you build a shower in the traditional method there are a lot of steps and if you skip one your shower will inevitably fail. Once you know what your doing with a Schluter Systems shower, it is as close to a fool proof shower as you can get. You have to put a lot of effort into messing one up. Need to make a curb or bench a bit bigger or add to an inset box? Just thin set a 1/2" piece of Kerdi board to where ever you need it. Building curbs and benches with cinder block, bricks or dry pack? No thank you. I'll use dust free, grit free, light weight foam board.
- A full line of products - Schluter has a line of superiorly designed and esthetically modern products. The drains look the best and are German engineered to last. Schluter profiles are better than bullnose because they are made consistently and will look modern 20 years from now. I have empirical evidence that Schluter has changed the tile game...every other company, Laticrete, Custom, etc. is emulating Schluter's line of products. You can see it for yourself on the open market...Plenty of Schluter knockoffs!
- Second to none customer service - Oh, you have a problem or a question? Let me give Timmy, the Schluter rep a call....Maybe we'll have him stop by the job. Go ahead and try that with another building product company. Want more information? Visit SchluterSystems.com to see their full line and watch in depth installation videos. If you're using my site as an information resource, you will love the Schluter site...videos, pictures, specifications....anything you need to know! True strength in knowledge.
Building with Schluter Systems is less labor intensive, gives your customers a better finished product and has eliminated a lot of the problems that building with tile has historically faced... When I see failed showers I think of the wasted resources, the wasted time of the homeowner/ installer and the bad name the failure gives to my trade. Ultimately, failures are unnecessary.
This list isn't even half of the practical advantages to Schluter Systems, there are many. If you want your bathroom to be water proof the cost is comparable to competing methods. WATER PROOF is the name of the game with bathrooms! Expect a numbers breakdown Schluter systems vs. Traditional shower building methods. That one is research heavy and will be a real zinger for the doubters!
I hope that for your next bathroom, you chose to use a company that has proven its merit in the building trades. ----SCHLUTER SYSTEMS.com
The best bathroom remodel in Woodstock, GA.
We start with a before and after of our latest bathroom in Woodstock, GA. This was a tub to shower transfer and it's a full Schluter Systems shower built with 12x12 Paneria Soft tile from Tilehouse of Marietta. We edged it all with Quadec Brushed nickel profiles to match the drain and trim kits. The plywood floor was screwed down with high quality screws and ground down to take off all previous finishes. I custom packed this shower pan and used Ditra uncoupling mat on the outside floor for underlayment.
In this pre grout photo notice...FULL pieces inside the inset box. Notice the layout...The box starts and ends perfectly on full tile. Notice the decorative inset band, smooth to the touch....not just flashy to the eye!
A grouted version. We used Mapei's Flex Color grout which is the highest quality grout available. I encourage you to click on the link and read the features of this grout. Ask your tile installer if they will be installing a high quality grout.
Where the walls meet the pan, where the floor meets the curb, the corners of the shower and the corners of the wainscoting, around the bench....I installed soft joints using Mapei's Mapesil FULL SILICONE caulking. Many companies will save time and money by using a cheap latex caulk, that doesn't last and doesn't perform half as well as a full silicone. We are playing the long game. We are going for longevity! Using this caulking adds an extra trip to the job because everything has to be dry and clean....but to us it is worth it because we are able to provide a superior finished product.
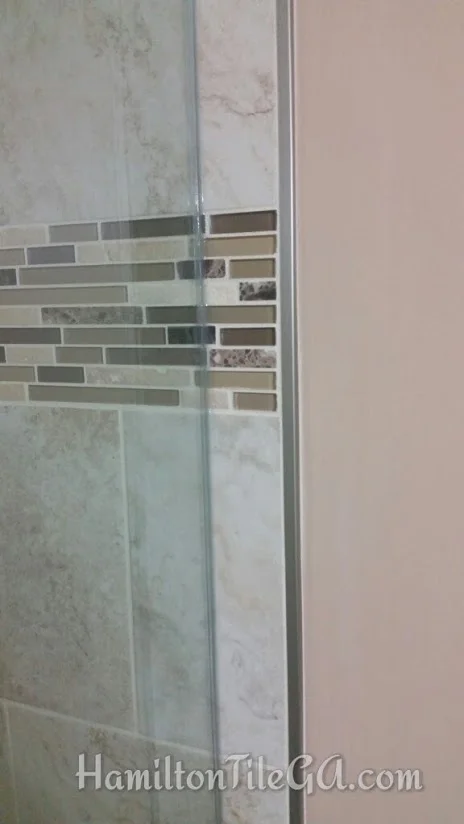
Dealing with glass mosaics takes a fastidious hand! The glass gets it's color from a paper backing. While cutting the glass, if the installer does it incorrectly, you will be able to see irregularity in the paper backing along the cut. We are experts at dealing with glass....Not only did I achieve a perfect cut (as you can see...It's ZOOMABLE) I also sanded down the edges so you don't get that jagged look.
Schluter makes a superior drain! Not only the installation design, but also the esthetics! When you use Hamilton Tile, you get a drain like this....standard.
Our corner benches are open bottom made with 2" structural Kerdi Board. There are no penetrations in our waterproofing! We constantly see traditionally built showers leaking around the corner bench!
Here is a walk through video of this bathroom. My client put a lot of sweat equity into this bathroom. He did his own tear out and plumbing and ended up saving thousands! If you want to save some money and have some skills, we are willing to work with you! I really enjoyed this job. Truly transformed this space. For a bathroom like this in your home, call us today!
The added cost of floor prep for large format tile.
I was at the tile store the other day and I was looking around at all the happy faces doing their tile shopping. I'm sure some are shopping for a back splash, others maybe for a bathroom remodel. I was left to wonder a very common question in my mind, "Who's installing all this tile!?"
While I was there I noticed many people looking at 6" x 36" plank tile (large format tile). Wow, the stuff looks great and you can tell the excitement in their eyes about possibly having that tile in their home. My main question to myself was:
"Has anyone talked to these people about the added cost of floor preparation for large format tile???"
There's added cost for big tile you ask?... The long and short of this is YES! The Tile Council of North America handbook states that....
"For tiles with at least one edge 15" in length or longer, a maximum allowable variation of 1/8" in 10' from the required plane, with no more than 1/16" variation in 24" when measured from the high point in the surface" (Page 31 TCNA Manual 2016)
So what this means is you cannot have a wavy floor and install a big tile! As the tile size increases, the effect of the floor irregularities is compounded. If there is a bump or dive in the floor it will make it impossible to install large tile. You will have lips and poor coverage and support under the tile.
I have found that very few homes have wood or concrete substrates that are ready out of the box for large tile. EVERY floor needs some degree of prep.
Prep, is short for "preparation". Meaning, flattening or leveling the floor to get it ready for whatever material you're hoping to install.
When we show up to a large area where we know large format tile will be set, what we'll do is take out a large straight edge, 8'+. We set it on the floor and decide what kind of prep will need to be done. Many times if there is flooring already down you won't know what needs to be done until the old flooring is up. This adds a bit of a mystery to the installation process and you need to make sure your builder gives you an allowance or find out if the unexpected labor is in his/her price. Many tile people won't tell you about the added costs until the tear out is done, and hit you with the extra cost! This is why I'm writing this post!
If you do indeed have a wavy floor there are a couple ways to fix the problem...You can self level the area, which will raise the level of the floor by as much as a quarter inch (think transitions between rooms) or you can use a product like Feather Finish by Ardex to fill the low spots, or you can grind the high spots. Or you may have to do a combination of all those things! The repair of the floor is where it is SO important to have a skilled, experienced tile installer. As I always say, the quality of the finished tile job is determined before any tile is ever set! Below is an example of our work where we used Lev-Tec leveling system to help get the flat floor:

With large tile the quality of the tile is very important as well. Every tile has a certain amount of warp to it and if you're looking for a flat, smooth floor you will want to cite the manufacturer for grout size and layout specifications. Many people want a 1/16" grout joint with a brick set...but on most occasions, the manufacturer of the tile will recommend NOT to install the tile in that manner. So, ultimately it's really not up to us or you, for that matter, how your tile is set. The layout and grout joint size is determined by the manufacturer and is backed up by the TCNA. A 50 % offset with a 1/16" grout joint will accentuate the warpage in the tile. The Tile Council of North America says:
"The actual grout joint size shall be at least three times the actual variation of facial dimensions of the tile supplied. Example: for tile having a total variation of 1/16" in facial dimensions, a minimum 3/16" grout joint shall be used." (Page 38 TCNA Manual 2016)
ANSI standard 108.02 also covers grout joint size, lippage and brick set. Read it all here for yourself:
https://www.ceramictilefoundation.org/blog/ansi-standards-tile-installers-best-friend
Would you consider it important to have your project installed according to national standards? If so be sure to hire a contractor that uses the "Handbook Method" (Like us)
Most tile has a great deal of variation. You CAN find consistent tile....but be prepared to pay a high dollar, if you want a flat, consistent floor. It can cost big bucks not only when buying high quality, A+ grade tile....but also for installation. Most interior designers and sales people do not have and interest in telling you what to expect in this regard. Their main priority is to sell tile and design services. Sales people often time promise the world but the material they are selling has too much variation to allow the installer to deliver on said promises.
Another thing to think about is that Larger tile involves larger tools! A more expensive score and snap…a much bigger tile saw. Getting “full coverage” under your tile is also much more difficult. Larger tile is also harder on the installer’s body!
When you're shopping for tile, know that bigger tile comes at a greater cost! Self Leveler is upwards of $30 a bag plus the labor and time of installation! For evidence regarding the consequences of not preparing a floor properly and not following guidelines for large tile, go to ANY COMMERCIAL SPACE that has large format tile and look around. You will see lips and dives everywhere. Here's an example and this is not our work:

This could have been avoided by not using a 1/16" grout joint and also not setting the tile brick set. Basic, common sense stuff if you hire an installer that performs due diligence and is willing to speak up.
A couple things to notice when hiring someone to tile a floor:
1. Does the installer check the flatness of the floor with a large straight edge?
2. Does the installer mention the extra cost involved in installing big tile, Like the possibility of extra floor prep?
3. Does the installer use some sort of leveling system to help get a flat floor.
4. Does the installer speak to you about grout joint size, tile offset and the fact that all tile has warpage?
5. Does the installer speak about complete thin set coverage, back buttering tile, expansion joints and crack suppression?
My top piece of advice for you is to have your installer go to the tile store with you to help you shop for tile. They’re going to know what to look for as far as tile quality is concerned and won’t be motivated by making the sale. If the tile you’re ordering is special order, they also may have some knowledge on which manufacturer is the best to buy from. Also, I wouldn’t be surprised when you get the special order tile, if you’re installer decides to send it back. We’ve had to do it before. That’s how you know you have a good installer .That’s a person who isn’t just going to throw something on the wall that’s mediocre quality.
Also, involve your installer in the design process. It’s almost a sure thing that you will get quite a few gems from a person who works with tile every day, for a living.
With that said, if you still decide you want large format tile be prepared for the extra cost of doing it correctly (following TCNA and ANSI standards) and I hope you are now armed with knowledge to help you avoid a construction nightmare, which have unfortunately become typical in this industry.
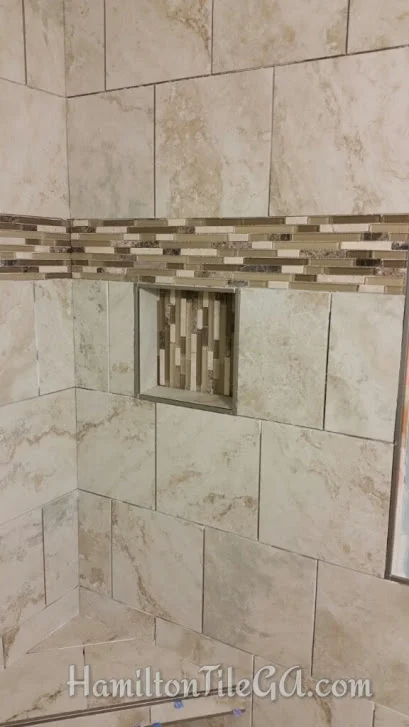
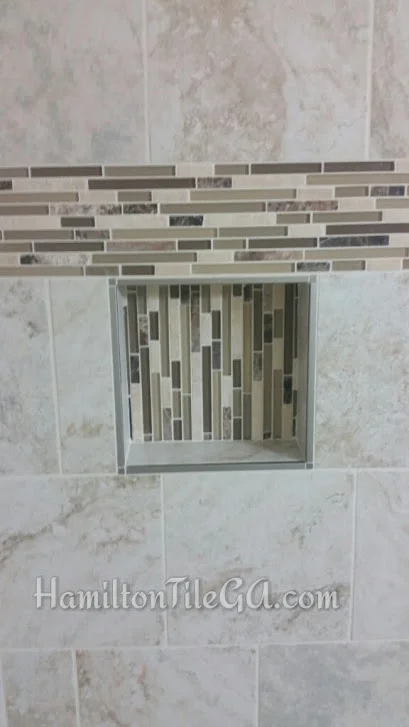
Another superior shower in Kennesaw, GA.
Here we are, back again with another updated bathroom for your viewing pleasure! This particular beauty was built in Kennesaw, GA. Our fellow tile guy Cain from A Tile Experience referred us for this job because it was out of his working range and Jason really delivered! We switched this from a tub to a shower and until you've used one of these showers you can't really understand how LUXURY it really is.

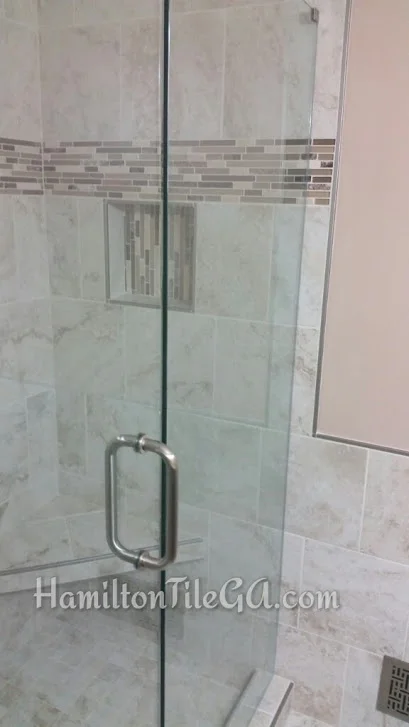
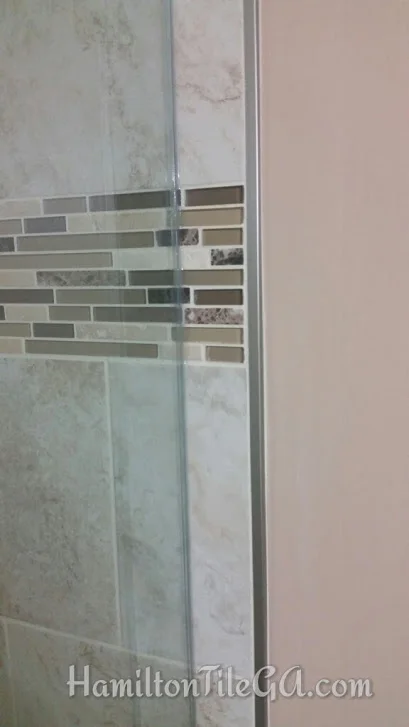
There isn't one piece of outdated, antiquated bullnose on this shower. All the tile including the inside of the box you see above is edged with Schluter Quadec profiles. A very small detail, but if you notice the finish on the profiles match the finish of the drain, and the finish of the glass door. In your minds eye, imagine the bench, box and shower edged with bull nose. That would be a whole different look for this shower... These small details make a shower pop and my outlook is that twenty years in the future people will still marvel at the looks of this space! Great tile work sells homes and will increase the value of this house! Think of tile work as an investment for the future.

To complete the "full service" Jason made a visit to the house yesterday to coordinate the shower door installation. We use Chattahoochee Glass doors (the best) for all our glass doors and they really don't need to be supervised, but when you hire us to redo your shower you can expect a high level of attentiveness and when we do use sub contractors, we will be there to help. We don't just send a stranger to your house no matter how much we trust the company.
Another shower in the books and we would like to thank the homeowners for having us. It really was a pleasure!
Our latest tub surround in Alpharetta, GA.
Another nice hall bath that we took concept to completion in Alpharetta, GA. The great thing about this job is that we earned it by building the homeowner's basement bathroom. Those jobs really are the best! Nothing feels better then knowing you did a great job on one project and earn another job in the same home! We handled 100% of this bathroom remodel. A before and after below....When we first arrived it was your standard builder grade bathroom with 6"x6" tile.
.
This is all 12"x24" porcelain tile straight set waterproofed with Schluter Systems products. So, of course this whole bathroom comes with a 10 year warranty. Can't get better then that. No, LITERALLY, you can't get better! We ended up reusing their old tub because it was an original cast iron unit (best) so there was limited plumbing.

Love the way the inset box turned out. This box is edged with Quadec Schluter profiles. Super sharp looking! Notice how the layout is perfect, the top of the box ends on a full tile. Of course we used Custom Prizm grout in the joints and full Mapesil silicone caulking where the tub meets the bottom of the tile as a soft joint to allow for movement. This caulking will last far longer then a latex product.

This is where I remind you to research the competition and find out if they are going to provide you with this level of finish. We will be back to put tile cove base in this bathroom. This customer certainly received the "full service" Hamilton Tile job and we thank them for having us. Hopeful that they will give us a FIVE STAR Google review and tell us more about what their experience was like.
Meticulous, Diligent, Thorough...We're bringing these words back to the construction industry!
How installers should dispose of tiling waste water.
Every tile installation has a certain amount of waste water involved. We fill up multiple buckets of water for cleaning and mixing. This water gets thoroughly contaminated with the thin set we use to stick the tile to the floors or walls. It makes the water white or the color of your building products. Not something you want to just dump willy nilly all over your clients property. On a past job, we were able to see how the other tile guys dispose of their waste water.

As you can see, this tile installer dumped his waste water in the middle of his customer's driveway. What a rude way to treat your treasured client! CERTAINLY not a FULL SERVICE tile job!
We always try to dump all of our waste water in one spot, off the finished landscaping, under some leaves or pine straw. In the past that practice worked just fine, but very often we work at homes that have 100% landscaped yard and if we are doing a bunch of work (1000sqft+) It really becomes a messy proposition. "Why don't you just dump it down the drain?" AHHHH..WRONG WRONG WRONG!
So our new technique! A truly conscientious, professional level fix to waste water. We're always developing and through my favorite inspiration resource, Instagram (be sure to check mine out!) I learned the fix of all fixes from @Lunastileandstone.

This $30 investment now keeps our customers' yards completely clean! We dump all our dirty water into this 55 gallon bucket and we added a spigot about six inches from the bottom. We let it sit overnight and all the heavy sediment settles to the bottom leaving clean water that comes out of the tap! When we are done with the job, we scoop all the 'mud' from the bottom of the bucket and trash it.
Another technique we use is the 'let it marinate’ method. All of the dirty water used during the day is left over night. The sludge and heavy sediment sinks to the bottom of the bucket by morning. The first thing we will do in the morning is dump off the (cleanish) water on top of the five gallon buckets, revealing the sludge that has separated at the bottom. We scoop that sludge out and put it in a garbage bag. The remaining remnants of sludge is cleaned out and dumped in your paddle cleaning bucket. At the end of the job, you only have one bucket of water to deal with, the paddle cleaning bucket.
Most crews just concede to the fact that sludge all over the yard is part of doing tile work. Here at Hamilton Tile we find solutions and this is part of the 'full service' tile job I constantly boast about on this site. Would you like people to work at your home that respect your property? People that leave it better than when they arrived? Do you want guys working at your home that won't trash your largest investment? If you are sick of careless workers and want to step up to conscientious craftsmen, give Ben and Jason of Hamilton Tile, Woodstock, GA a call today! We're looking to rebuild the good name of the construction worker!
If you're a fellow tile guy, don't be afraid to snag this idea...your customers will thank you!
Check out the water filtration bucket in action below at a job in Roswell, GA.

12 Likes, 3 Comments - Hamilton Tile (@hamiltontilega) on Instagram: "Great idea @lunastileandstone ! Awesome way to keep the sludge off the landscaping. Dirty on the..."