

A lesson I’ve learned over a decade of tiling:
👍What’s BEHIND the tile determines the overall finish of a tile project!👍
“Get your wall framing and backerboard FLAT and PLUMB!”
That will be the biggest challenge when tiling a wall in your home.
Whether that’s a shower or a back splash…it will be your steepest hill to climb.🏔
Most residential or commercial interior walls are not FLAT.
What do I mean by flat?
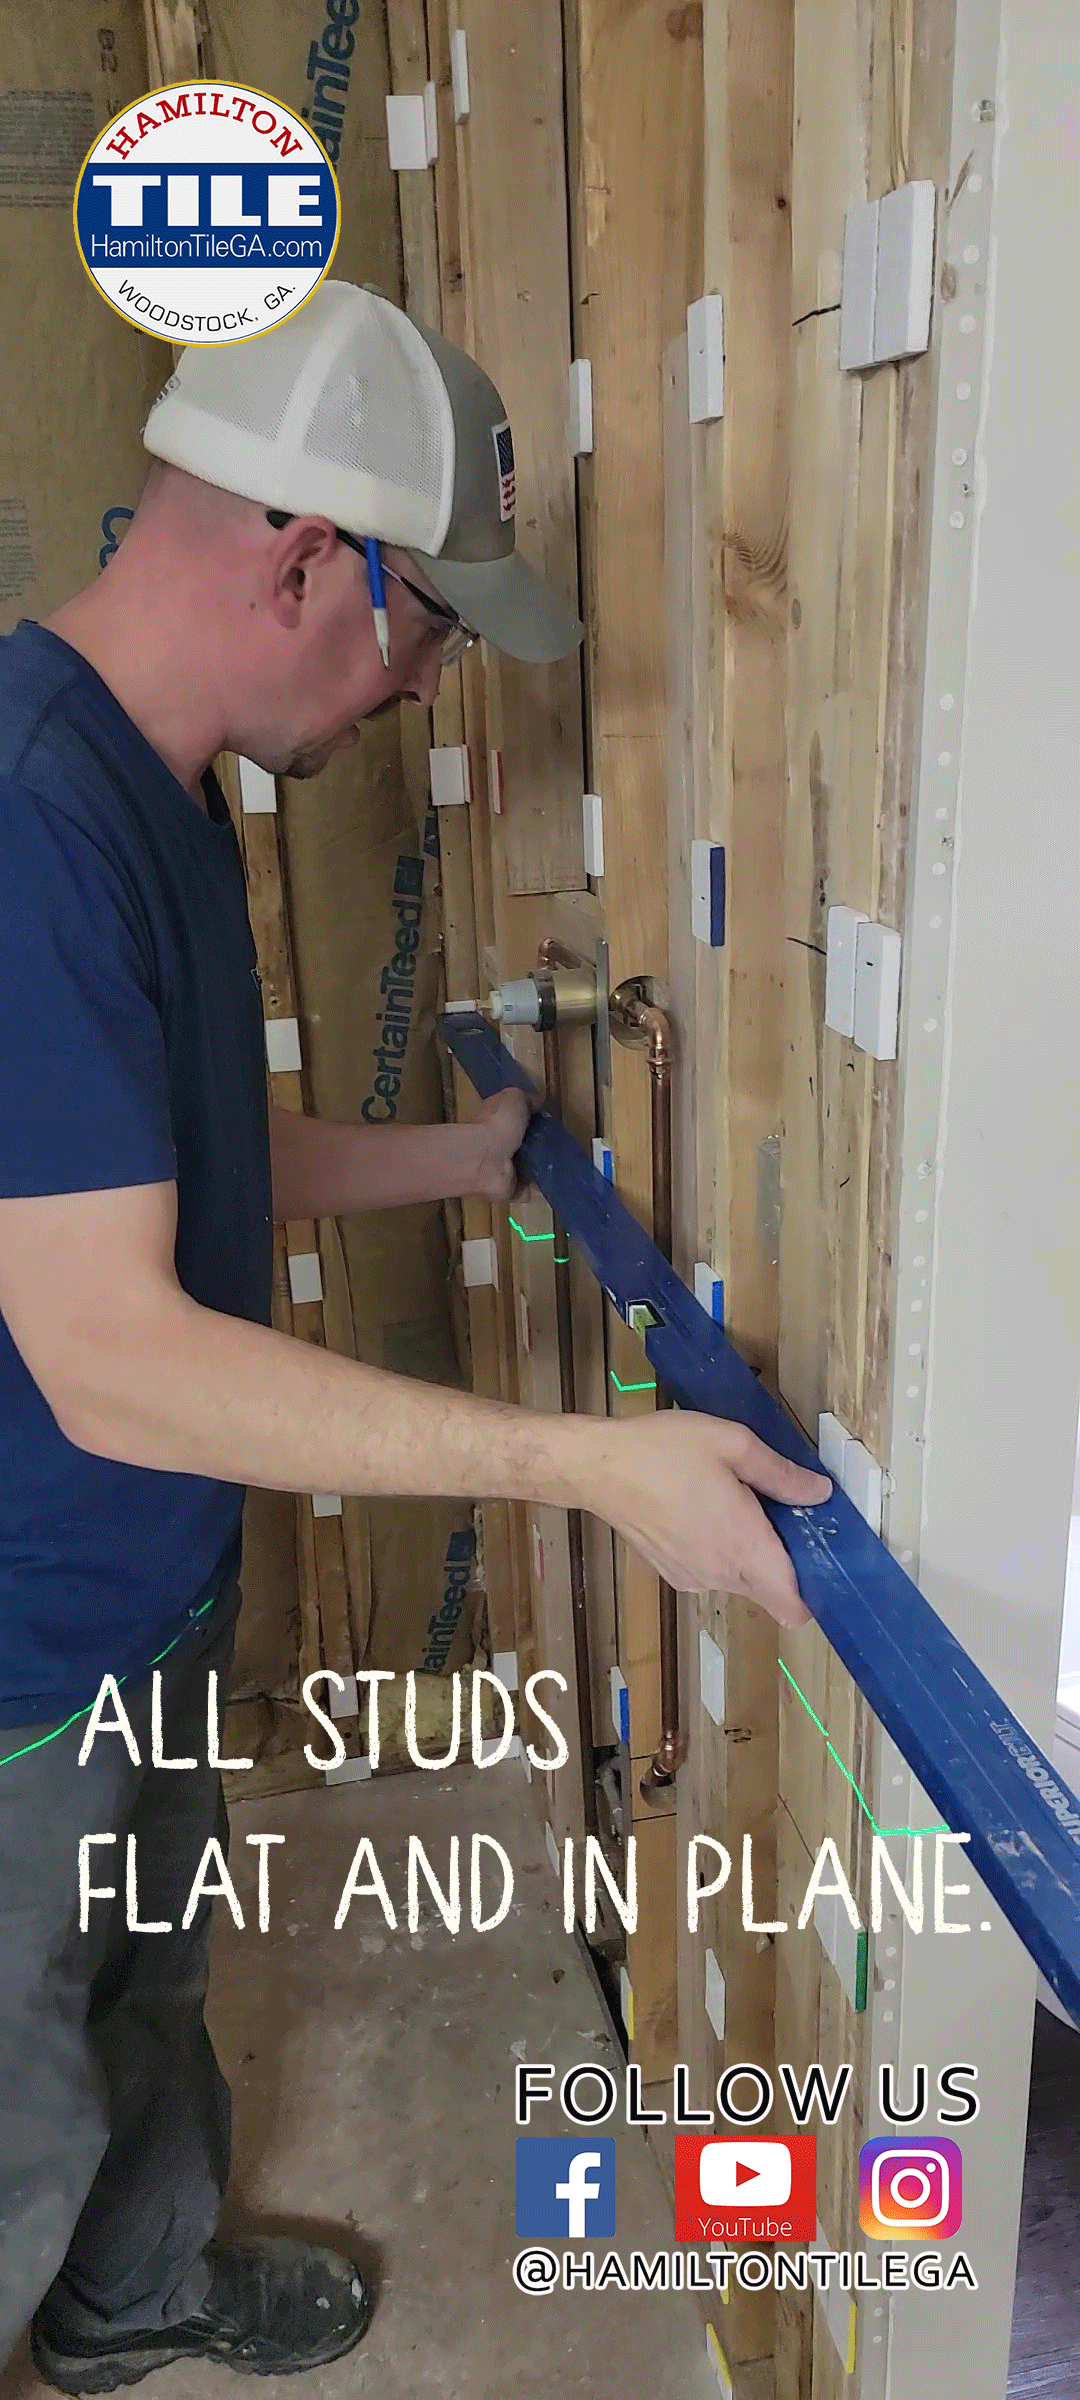
When you put a straight edge (level) across all the wall studs, they should all be IN PLANE. Every wall stud should touch the edge of your level. Tile DOES NOT BEND, so, when backer board is installed on wood framed walls, it must be FLAT.
Tile in general, especially rectified edge, large format tile has stiff requirements for installation.
ANSI 108.02 Section 4.1.4.3.2
Vertical Surfaces: For tiles with all edges shorter than 15 inches the maximum allowable variation is no more than 1/4” in 10ft and no more than 1/16 in in 1 ft from the required plane, when measured from the high points in the surface. For tiles with at least one edge 15 in or longer, the maximum allowable variation is no more than 1/8th inch in 10ft and no more than 1/16 in in 2 ft from the required plane, when measured from the high points in the surface.
Your walls MUST be flat in the prep stage. “Fixing” walls with thin set while installing tile is not the way to go.
Tile is FUN when installing on flat walls and that is what I want for you.💃
Your walls should also be PLUMB meaning your framing is PERFECTLY VERTICAL.
This system will help you get your walls FLAT AND PLUMB.
We are proud to be a Built With Foam Affiliate, it’s a product we use and support!
Please be sure to use our link for 10% off anything on BuiltWithFoam.com https://builtwithfoam.com/?ref=3238
What is the Built with Foam SHIM?
The Built with foam shims range from 1/16” - 1/2” in thickness and are made of water resistant, recycled foam. They are light weight and easy to cut and position. They are color coated according to size.
Foam shims from Built With Foam offer an array of benefits that make them a smart choice for any wall tiling project. From their uniformity and durability to their ease of use and environmental friendliness, these foam shims help you achieve professional-grade results without breaking the bank or using a lot of time. For those keen on a flawless tiling outcome, foam shims are an indispensable tool in your tiling arsenal. 💣💣


A “flat” wall means all studs are in plane and there is very little VARIATION in the wall.

Using a long level is a great way to check your work, but we will show you how to do all of this with a laser line!

The BUILT WITH FOAM WALL SHIM KIT is a very fast and effective way to PREP your wood framed walls for TILE if you are a DIYer OR a Pro tiler.:🔑

Links for Items listed above:
Best laser level for the money: https://amzn.to/3R3pNZ9
Dewalt Laser - https://amzn.to/3qOSUoq
Folding Rule: https://amzn.to/3qOlvdy
Marker: https://amzn.to/3QYUpLn
Caulking gun: https://amzn.to/3OW4Ht1
PL Premium Glue: https://amzn.to/45L86Sy
Staple Gun: https://amzn.to/45tPxCD
Built With Foam Kit: https://builtwithfoam.com/?ref=3238

How to use the Built With Foam Shim system.
〰️
How to use the Built With Foam Shim system. 〰️
I’d like to start this tutorial by stating that this wall prep technique is classified as ADVANCED but I believe there is NO REASON a DIYer with some basic skills can’t pull this off. 💪
YOU NEED a good laser. CANNOT do this process without it.
To use this system, understand what you’re dealing with:
Your framed wall either leans IN or OUT. It’s out of plumb one way or another.
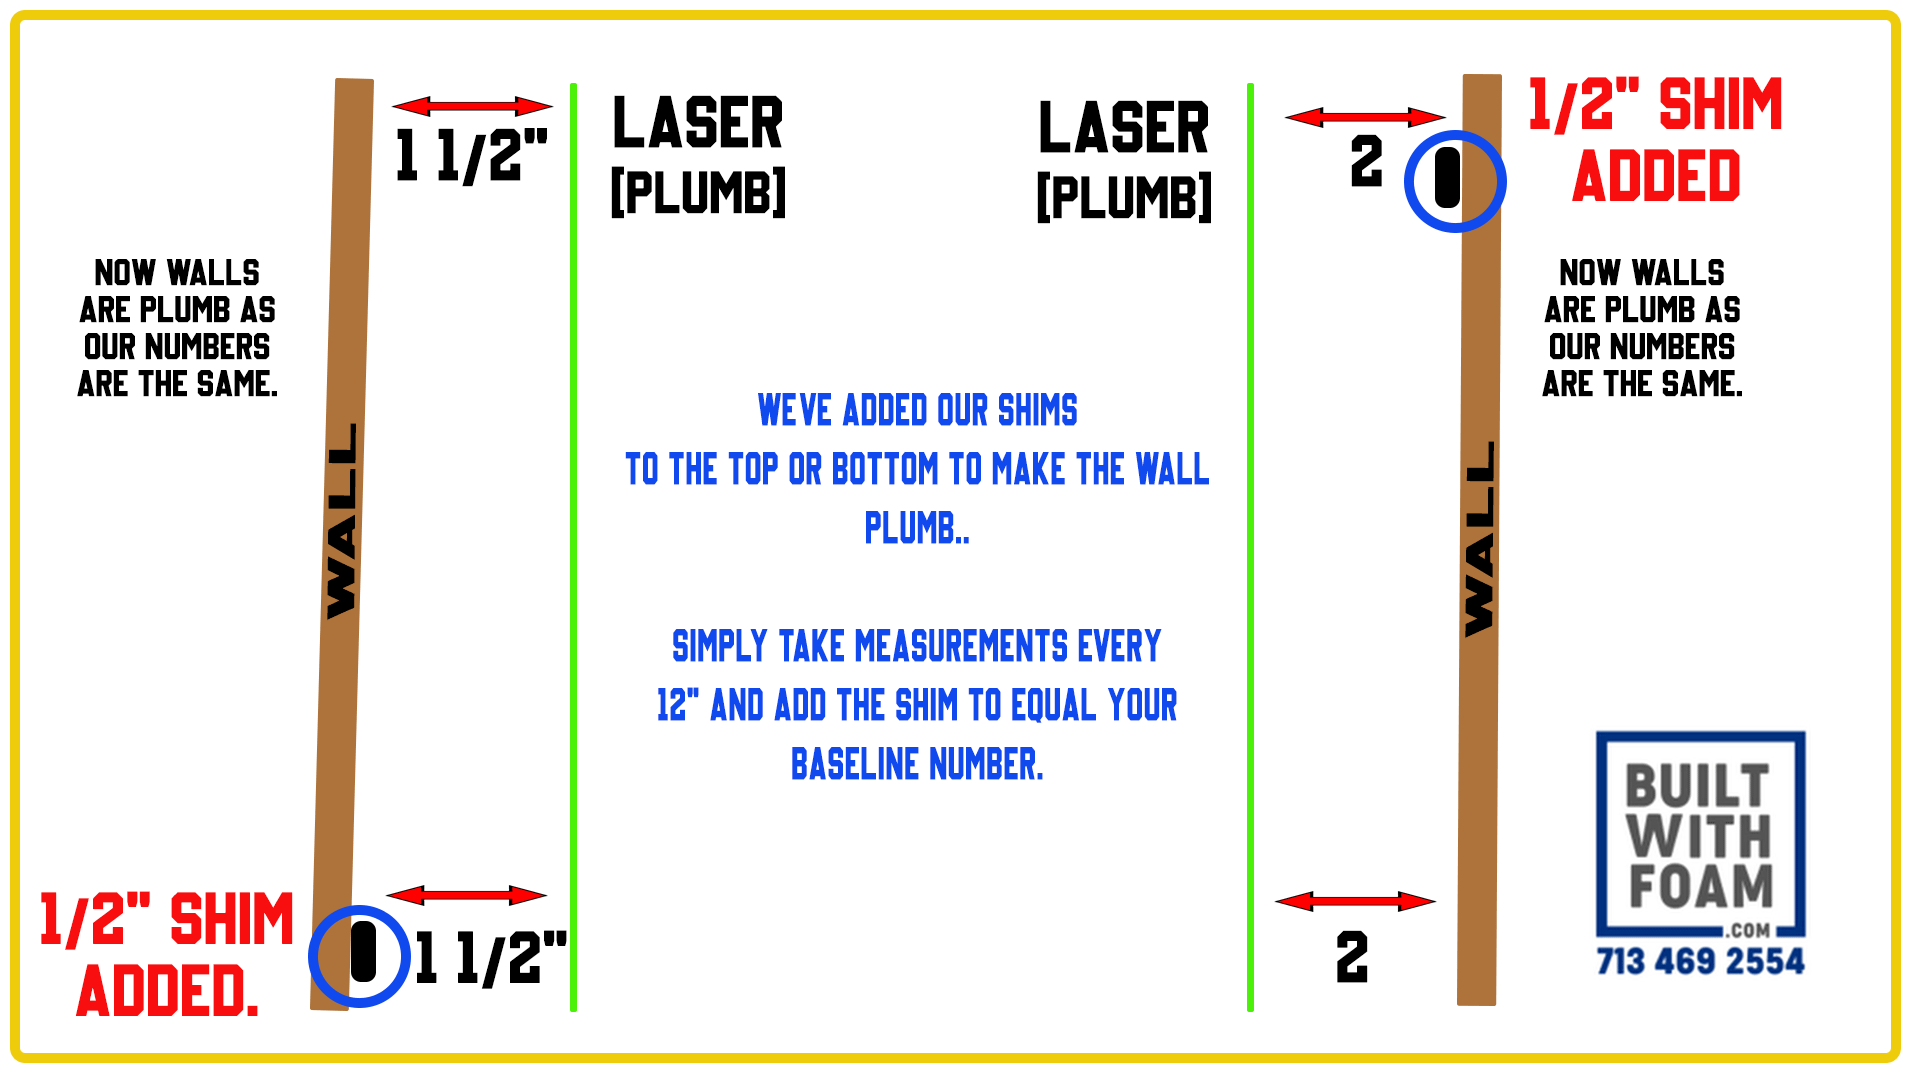
The shims will help you PLUMB the wall by adding the thickness you need, top or bottom.
🛑⤵⤵Study the graphic below.⤵⤵🛑

In the above scenario, the example on the left…we’ll add a half inch shim to the bottom. Now the wall is plumb and we’ll fill in with the necessary shim every 12 inches.
The example on the right, we’ll add a half inch on the TOP to make our numbers the same. The wall is now plumb and we’ll fill in with the necessary shim every 12 inches.
✅You now have a basic understanding of what we’re wanting to accomplish and what the issues are, here’s a step by step process explaining how to install the Built with Foam wall shim system.✅

Put glue on the back of your Built With Foam shim to stick it to your framing on the 12” mark.
Clean all the junk off of your studs. Get your framing COMPLETELY clean. No glue, no nails, no screws. We like to use a planer to get our studs very clean.
Mark the studs with a marker on the wall that you want to plumb and flatten every 12” from the top. We take our laser and pole and set that up to aid in this process.
Take your laser and set it up in a corner, or in the middle of the wall on the floor, (depending on your laser). Turn it on. It will shoot a line parallel with the bottom plate of your wall. You want that line perfectly parallel with the bottom plate We set ours up at 2”, but that number can be any number under 6”. We’re going to do 2”. Laser line 2” parallel with the bottom plate of the wall.
Now, take your folding rule and on every stud, every 12” mark, take a measurement. Find your HIGH spot or the spot on the wall that sticks out the FURTHEST. We set our laser up at 2” parallel with the bottom plate…Our highest spot will be our LOWEST number. Our high spot is 1 1/2” .
Subtract 1 1/2” from 2”. That gives you 1/2”. Get two 1/2” shims from your kit and put them on the bottom plate. One on one end of the wall and one on the other. Your green parallel line is now at 1 1/2”.
This step is to make for easy math. Take your laser and make it parallel with the base AND the added shim at 2”. So, your laser was at 1 1/2” with the shim. Now it’s at 2” with the shim.
Your laser is set up at 2” again. Go around at every 12” mark on the studs and take a measurement. If the measurement says 1 3/4” you glue and staple a 1/4” Built with Foam shim to that mark. If another mark says 1 7/8” you add an 1/8” shim to that mark with glue and staples to make the measurement 2”. EVERY MARK YOU’RE MAKING 2” with the right size Built With Foam shim.
Repeat the process on every 12” mark. Remember at your transition from backerboard to sheet rock…the “edge transition” (if you have one) put the shim under the edge of the sheetrock so the backerboard and the sheetrock are sitting on the same shim. This way, you’ll have a smooth transition!
When you have your shims up, fill the space in between the shims with low expanding spray foam. This will help stiffen up the install and decrease deflection.
Install your board remembering to put the screw on the 12” mark. You must put the screw through the foam spacer.
Put a level on the installed backerboard and check for plumb and flat. There should be no space between the edge of the level and the backerboard. The level should lay FLAT on the backerboard with no voids.
Click here to download these instructions to use as a checklist.

You can get the gun we use by using this link: https://amzn.to/3qLB4Ty
That’s it! If you follow this walk through exactly, you will be on the road to FLAT and PLUMB walls. 🆒

When you have BLOCKING for glass doors or grab bars, use thin set to WET SHIM the void between the blocking and the spacers to stiffen it up!
This system has been a game changer for us, in helping prep our wood framed walls.
We’ve tried many ways: sistering studs, using spacers and drywall shims, but all of them have their challenges.
The Build with Foam Shim kit solves the specific problem of flattening and plumbing walls and it comes in an easy to use package.
This system is just so CONVENIENT. That’s the point.
On average this process takes us about 3 hours. It took longer when we first started but now that we have done so many, this process has become very efficient. ⏰
It’s great that they are color coated. You learn what color corresponds to what size very quickly.
We get around 4 showers out of each box. The box of spacers is around $100.

Built with Foam shims help you get a very smooth transition between your shower backerboard edge and the sheetrock edge outside the shower.
Good news: Often you will use MANY more of ONE type of shim, say the 1/16”. It’s very common.
Built with Foam will send you more of ONE SPECIFIC size if needed.
Have some sort of cleaner and rag near by to clean the little bit of glue off your hands. (Tub o Towels)
We also find that these shims have many uses around a tile job. They make for great stops, so we can get the proper slope. Its great to have a kit of shims at set thicknesses to use.
Jason Hamilton, a 23 year veteran TILE INSTALLER and BATHROOM REMODELER gives the Built with Foam Shim System his full endorsement.


I hope you found this post and video useful and we were able to teach you how to use these shims.🙏
Maybe we helped get you out of your comfort zone to try something new; a new way.
🌟🌟If this was the case, please consider using our affiliate link. It will get you 10% off your order on Built With Foam.com.🌟🌟www.builtwithfoam.com
We fully endorse this product. We use this product. We love this product and we are happy to finally have something like this that we can stand behind as a really USEFUL system that makes our wall prep much more convenient.
PLEASE CONSIDER USING OUR AFFILIATE LINK TO PURCHASE YOUR BUILT WITH FOAM SHIM KIT.💙
