

This tile installation blog is your one stop shop for trade secrets and general information on tile installation. If you are a homeowner and looking to purchase a tile shower, back splash, tile floors - Let us help you not get ripped off. Look into the mind of a Pro tile installer. I’m sure to help any DIY tile person too with videos and photos!

DIY wood rot repair for tile: It’s wise to over build!
I’ve seen a rash of under built floor repairs in the field, so today, I AM SOUNDING THE ALARM! For all you DIYers out there, or simply homeowners who care, it’s wise to over build your floor repair when you take out a piece of your existing sub floor to repair rot or damage.
What I’m seeing when I’m on the job is a lot of cutting of subfloor without proper BLOCKING put back in to support the substantial weight of a new tile floor. A certain degree of rigidity must be present in a subfloor when it is meant to support tile. Notice the photo below. You have the two joists. That was originally sufficient when supporting a whole sheet of tongue and groove plywood. The tongue and groove locked the plywood together, so it was supported. But once you cut out a piece, it has to be supported around all four sides of the plywood that is going back in. If you put a piece of plywood back without supporting the sides (by putting in additional blocking) there will be too much movement! Tile and MOVEMENT do not mix!

Do you know how you judge if your subfloor repair has too much movement? It’s easy! WALK ON THE REPAIRED FLOOR. The spot without extra blocking will flex and move, that’s bad. In certain instances, even with ¾” plywood, you’ll feel like you could put your foot through the floor! Don’t ask how we know! 😊 But you will notice if you put blocking in, between the joists, like in the photo below, the movement will stop and the floor repair will be far more rigid.

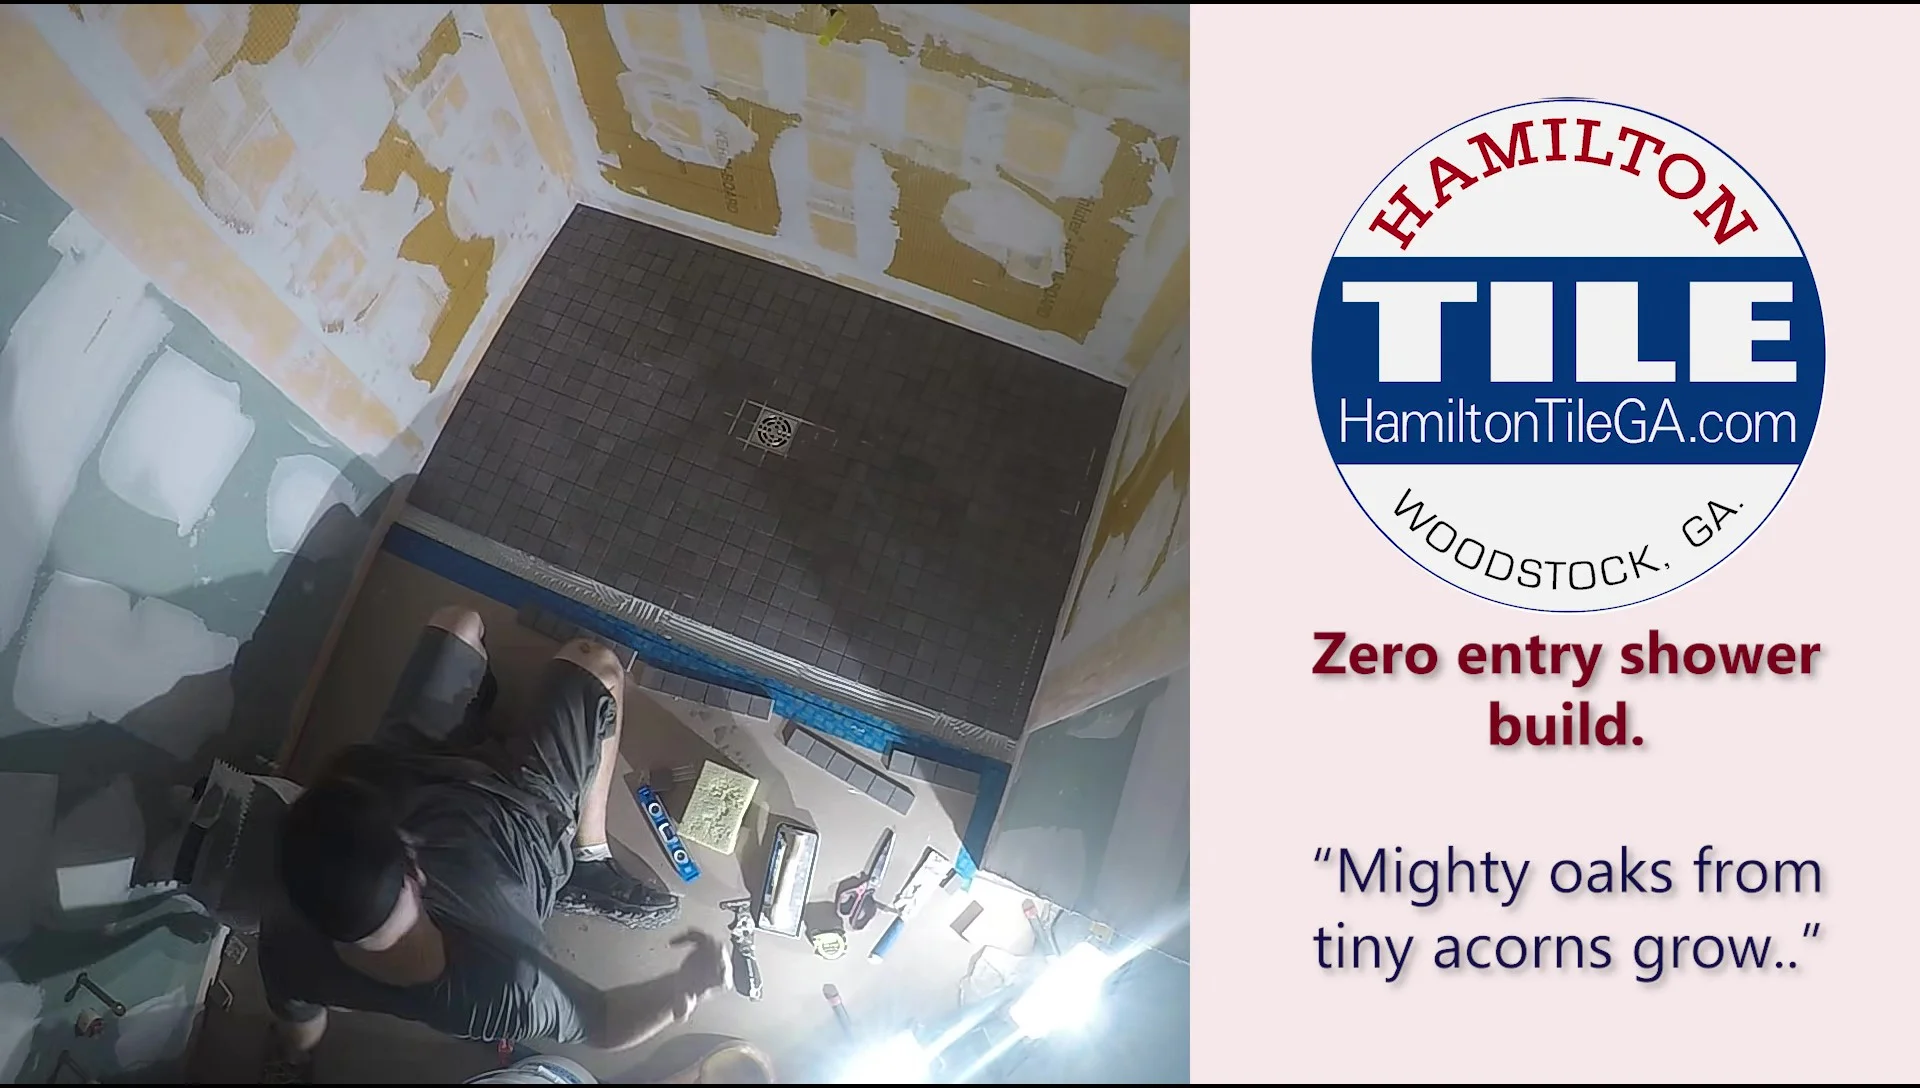
This particular area (the shower pan) will have over 500lbs of material on top of it. Build it STIFF and STRONG.
What’s the point? What is the conceptual, overarching theme of building with tile? Over build, Over engineer, over block. MORE IS BETTER. Tile is a permanent finish and it does not like movement. Any movement in a substrate results in cracked grout, lifted tile, etc. A tile floor needs to meet specific deflection specifications.
So, if you’re using tile, if you think something needs to be built stiffer, DO IT. Cement board, for example, does nothing to add to the strength and rigidity of a floor. Always, add wood, stiffen it up and you will have a flooring that will last the lifetime of your home. That’s the whole point of tile!
If you like this type of content, be sure to like this blog post and be sure to comment.

Tons of blocking here!

A bathroom remodel built to last in Marietta, GA

Bathroom shower remodel located in Marietta, GA.
This is video breakdown of our latest bathroom remodel in Marietta, GA.
In this video we break down everything you might want to know about this bathroom we recently completed. We go over the high quality materials we use as well as our techniques that went into building this lasting bathroom. We also go over the over all cost of this bathroom as well as its individual parts.
It was a very fun bathroom project to take part in and we really feel quite proud of our accomplishments here.

Jason Hamilton: Nominated for NTCA Tile Craftsperson of the year.
Jason Hamilton, owner and lead installer of Hamilton TIle has been nominated for the National Tile Contractors Association’s Tile Craftsperson of the year.
To be nominated setters had to be setting tile for a minimum of 15 years and were nominated by a co-worker or someone who could speak to their ability to set tile correctly, their craftsmanship or artisanship, the breadth of their work, their ability to resolve issues on the job, their ability to mentor or lead, and their drive to continually educate themselves on new materials, products and methods in the industry.


Ardex Academy: Worth it or waste? Hamilton Tile weighs in on Continuing Ed.
The guys at Hamilton Tile participate in a day at the Ardex Academy in Dallas, GA. Watch the video below to find out: WORTH IT, OR WASTE?!

Shower installation process illustrated quick guide.
Here is a basic overview of our shower installation process. Most showers fall within this process. Square footage is irrelevant. Big shower or small shower. We don’t skip steps or combine steps. Each shower we follow the same general process. Bigger showers with more options (inset boxes, complex tile, benches, etc.) add time, but generally speaking, this is our system for shower building.


Small tile floor installation: Illustrated quick guide.
This is a general overview of a small tile floor installation to help you better understand the installation schedule and process. Enjoy.


Amazing Acworth, GA tile bathroom remodel.
Our most recent completed master bathroom remodel was located in Acworth, GA. This client acted as his own general contractor for this project and hired us for the tile work. The original shower to the home was a mud job, so it was a bear to tear out! A mud job is the traditional way of building a shower where they would embed common masonry material (sand, lyme, portland cement) in wire and set tile on that. It’s heavy and nasty to tear out, but it works! We replaced that with a Schluter Systems shower, lightening the load. We built this shower according to Schluter System’s standards, complete with official paperwork. It has a lifetime factory warranty. How much peace of mind would you get knowing that your bathroom is covered by a lifetime factory warranty and installed by two of the only 1600 Certified Tile Installers in the entire United States?
We take our preparation stage very seriously. The whole job hinges on how well we prepare the area before any tile is set. We would be the fastest tile guys in the world if we didn’t have to rebuild all the shoddy work from when your home was built! We do this everyday and when we think about the amount of going backwards we have to do, it is mind boggling. We build according to Maximum, not minimum standards. Tile work: it’s like a barbecuing a brisket, low and slow but when it’s done it melts in your mouth! Step by step, no corners cut and when we’re done your bathroom will last a lifetime.

My favorite part of building these is the thought of showing you all our work. I always say that people who show their work, take pride in their work. It’s like my high school algebra teacher, “Show your work!” When people hire us, it’s never a mystery what they are going to get. I feel like it provides great peace of mind for our customers. Our target market: “If you care about how your project is built, we want to work for you!”

Part of our “Full service tile job” is handling all aspects of the job. Including acquiring all the material in order to ensure a consistent finished product. This is day two, all materials loaded at Tile House in Marietta and delivered to the job site!


I’m constantly harping on this, because I know what kind of thin set coverage most tile installers are getting under their tile. It doesn’t look anything like this! Full thin set coverage under the tile is so important to getting a lasting finished product! These tiles are 24” x 24” and 12” x 24” respectively, they need to be supported!

Lippage systems (the green clips) are a pro grade tool. This tile was a gloss tile, so we used a specific type of lippage system called MLT. It will not scratch the tile like wedge style lippage systems. Check out the video below for a full explanation of what these lippage systems are all about and watch how professionals install tile.
My marketing is directed specifically to those who want to know and trust the people who work in their homes. We market and sell to folks who want to hire people that share similar values. We understand your standards of etiquette, because we SHARE your standards of etiquette. If you wouldn’t want the people building your master bathroom USING your master bathroom, you should think twice about hiring them to construct your master bathroom. My name is Ben Santos, this is Jason Hamilton and we close the toilet seat.

This bathroom received Kohler all the way. The bar below was a Kohler piece, that we installed. We covered all bases by putting significant amounts of wood blocking behind the tile so this thing is sturdy as all get out! We also installed this Kohler glass door. Obviously, Kohler is extremely pricey stuff. If you’re spending thousands on certain items, how important is it to you to have competent, conscientious, credentialed people install these items? We are those people!


The installation video above gives you an inside look at this bathroom being installed!


I enjoy the final days of the tile install. I spend a lot of time fine tuning details like polishing the gloss 24” x 24” porcelain tile on the floor. I kept thinking about the final reveal, all the cardboard finally up, when the homeowners would finally see the finished floor. I did’t want them to see one spot in the sunlight when they looked down! Every time I thought I was done, I would get up and see the sun hitting the tile at such an angle and I’d see a spot! So, I’d get down and do some more polishing! I did this for about an hour and a half, until I got it perfect!

Below are a few finished pictures for your viewing enjoyment. David did excellent with his side of the job. He was very invested into this project doing much of the work himself. I mention often that we are ‘winners’. Part of being a winner in the trades, is running toward accountability and not away from it. Feel free to have high expectations when you hire us. We invite it.

Free standing tubs are what I lovingly and respectfully call “Budget Busters”. Not only can the tub be remarkably expensive, but the filler neck, which is all finished, traditionally has a jaw dropping price tag. Add the cost of the plumber to set all this up and the movers to get this behemoth into place; the extra tile underneath it and the wainscoting around it, you’re easily looking at an extra $8k. At the same time, bathrooms sell houses, home buyers love to see free standing tubs, so think about the value added when trying to offload your home.


In order to get a finished shower floor that looks like this, notice there are no sheet lines; we pulled all the stones off of the sheets and set them individually. Check out this blog post for an in depth explanation on why we do this, and any tile installer you hire should do the same! Way more time, but a much better finished product. You aren’t paying us to see distinct lines on your shower floor!


Finally, our five star google review, that is absolutely on point! Thanks David!


Tile to carpet transition, different heights. Our solution!
When remodeling a bathroom, very often the tile will be significantly higher than the outside carpet into the bedroom. No one wants a toe stubber right there but luckily we have a solution that works unbelievably well. Today I’m spreading the good will be giving you our hard earned trade secrets!
Enjoy the video and if you could please like and subscribe to my YouTube channel, I would greatly appreciate it!

Marietta, GA pro tile pebble floor installation. What's the DIFFERENCE?!

Jason installing a pebble tile shower floor in Alpharetta, GA
In this vlog post I go over how we install tile pebble floors and why. We do it a little differently than most but it’s what we have to do to get a professional grade finish! I want you to know, we’ll go the extra mile on your project.
For an extremely informative article on tile pebbles check out the DIY Tile Guy’s blog! There’s a lot of good information on this subject to be found there.
https://www.diytileguy.com/pebble-tile-flooring/
Check out the video and be sure to like and subscribe to my YouTube channel.

You're getting a BACK SPLASH: A comprehensive guide.

This blog, “A Tile Guy’s Journey” has been more of a “vlog” lately, so I’ve decided to put out an article that is sure to help you, if you’re thinking about a new back splash. This will be your comprehensive guide!
Back splashes are the centerpiece of a homeowner’s kitchen. They are a functional, piece of art and an expression of your personality. Functional, by being a hard surface that is easily cleaned around a busy area. Art because they are aesthetically pleasing; we all enjoy looking at beautiful things!
In this article I will be writing about back splashes in the context of RESIDENTIAL REMODELING. This model will work best if you are hiring a tile installation company directly or if you are working with a builder.
********************************************************************************************
CLICK HERE TO FIND OUT 8 REASONS OUR BACKSPLASHES ARE BETTER!
When you’re preparing for your new back splash, get a rough idea of what you want. Use Pinetrest, Houzz or Instagram to help you narrow things down. Realize, the pictures you see on those sites are installers’ BEST WORK.
Once you’ve narrowed down your choices, find a reputable store to source the material. Ask about price and availability. Heck, maybe you’ll get some alternative ideas from the store!
Buy a high grade tile with an ANSI label on it. Not all tile is the same. No matter how good the installer, if they have garbage tile to work with, it’s very difficult to create something incredible.
Have the person who is going to do the install arranged before you purchase tile. A great place to start is on Google, looking for a detailed website that has examples of their work and photos or videos of them performing their work. People who document themselves working, not just the finished product, take pride in their work! It also helps you verify who is ACTUALLY DOING THE WORK. That’s the guy you want to vet, not the guy who sells you the job. Look for reviews. They’re hard to get so, if you’re installer has a bunch of detailed testimonials, you’re part of the way there. Feed back from other installers on their social media is a great sign. A tile guy who is active in the tile community will also be up on the latest installation methods and products. Look for certifications and credentials. You wouldn’t go to a Dr. without a PHD you shouldn’t hire a tradesman without some degree of credibility. “Experience” is just a word and “Quality” means nothing with out a detailed explanation of what that means.
I recommend paying extra to allow for your tile installer to handle all aspects of the tile acquisition. It’s tempting to think that it’s no big deal to pick up the tile. It’s more complicated than that. The installer will make sure you get consistent dye lots; They will make sure the tile isn’t damaged and that you have the right amount. Is this a nominal size tile? Have you ever walked into Home Depot and been turned around not knowing up from down? That’s what the tile store will be like, in overdrive. If there’s anything wrong with the tile or if anything unforeseen happens (likely) it’s the installer responsibility NOT YOURS. You have better things to do with your time, trust me.
Get his or her opinion before you buy any tile. Is the tile you’re looking at a quality tile? Are there any stipulations involved with the installation of your desired tile? Does the purchase of the tile you want change the scope of the job?
We send our clients to a specific shop to speak with our designer. You walk in, tell them you’re with Hamilton Tile, work with the designer to find what you like. We handle the rest. Other companies will have their own system, but that’s ours and it works great!
There are infinite choices for your back splash depending on what you like and what tile fits your budget; but here are three major differentiators that matter to tile installers. Is the tile:
Natural Stone
Porcelain
Glass
Glass is the most technical install because, IT’s GLASS. We use a fancy-Dancy thin set, specifically engineered for glass and specialized saw blades, for instance. It takes an excess of skill and precision to install to a high standard of finish. What does a high standard of finish look like? I talk more about it in the video below. Glass is going to be your priciest option.
Natural Stone is the second most technical install. A tile guy must eliminate the use of time saving “snap cutters” with this material. That can add a lot of time and effort running to the saw, which will be set up outside the home. Imagine the distance between your kitchen and the garage, we’ll be making that trip for EVERY CUT. It will likely have to be sealed which adds another step to the install and a small amount of extra money. As far as functionality, natural stone is not as easy to clean. Imagine spaghetti sauce on a tumbled stone. Yuck! There can be added maintenance. The material is, on average, more expensive to buy and install.
Porcelain is your most installer and homeowner friendly material. A good installer can put it up efficiently; it’s the least number of headaches. For a homeowner, it’s tough and maintenance free. An example of porcelain tile would be traditional subway tile.
Sometimes, certain mosaics combine all THREE! Yay!
Tile is as varied as the rainbow! The type of material matters because many types of tile have different installation requirements and standards. Many tile can have different installation techniques that are required. Similar principles, but distinct practices.
If you like detailed back splashes that look like a lot of work to put in, expect a higher price from the installer. What does “a lot of work” entail?
Cutting around light switches and electrical boxes.
Patterns like herringbone.
Kitchens that are difficult to access (upstairs.)
Decorative insets.
Difficult material (glass, mosaics, natural stone)
Tiles that are not square or rectangles. Circles, arabesque, etc. These make it hard to cut a square edge!
Are there inside or outside corners? How many corners?
Will the installer have to climb a ladder to install the tile on the wall? Over cabinets, or around a vent hood?
Moving on, without a doubt, the most difficult part of a back splash is the tear out or demolition of an old back splash. (if you have one.) We don’t just show up and start going to town. Hours are spent protecting your home. Covering countertops and cabinets, covering the floors, putting up zip walls and preparing for dust containment. A demolition is a huge liability for a tile company. We are working inside your house around finished plumbing and cabinets, finished floors and walls. Not to mention, what is buried inside your walls when we are cutting and hammering out the old back splash. There are horror stories of people cutting through water pipes and gas lines. We’ve been close ourselves! Don’t think it doesn’t happen, because it does! Your installer also must dispose of the material from the demolition. Don’t sleep on the demolition and be sure the people who are working in your home are conscientious and respectful.


After the demolition is complete, which usually takes one full day, we fix any framing. This means straightening and sistering in studs to give a place for our new backer board to be secured. It’s very important to have flat walls with no bumps because this will affect the overall look of the back splash. After all that is done, the old backer board is replaced with new. Some people use drywall, we prefer an engineered, foam board, like Kerdi or GoBoard. Foam board is more expensive, but it is an upgrade because it’s waterproof. It also cuts down on the dust inside your home.

All the corners and seams get seam tape and we have ourselves a fresh pallet to install your new tile. The prep stage is the most important part of your back splash install, before any tile is set. This part dictates how the whole job is going to go.
Once the prep is complete your tile guy will do a rough lay out. You’ll want to be on site for this part to discuss your options. Options like:
Mirrored or wrapped corners. Click here for informative article.
Inset placement, any other feature placement.
Where you want to stop the tile.
What kind of pattern will you use? Straight set or brick set? Diagonal or herringbone? Click here for descriptive article.

*************************************************************************************
Be on site for the different stages of the back splash install. Tile is permanent, and there is nothing worse than having a back splash complete and the homeowner wanting to make changes. If you see something wrong or something you don’t like, TELL YOUR INSTALLER, IMMEDIATELY. The next day it comes out with a hammer! Many choices that tile installers make are completely subjective. There is no objective way to do certain design features with tile, so, it all needs to be discussed PRIOR to the tile going up. If you have complete trust in your installer (preferred) great, but if you have strong preferences in how you want things done, be involved. We prefer customers to be invested in what we are doing, rather than having issues once everything is done.
Realize that your home is probably not constructed perfectly. You will have to make compromises if you don’t want your whole kitchen torn apart and redone to accommodate for imperfections out of the remodeler’s control. Why are some things out of the remodeler’s control? Whenever your house was built, it was put together, presumably, below par! Be flexible and open to unorthodox solutions. An example, your granite counter tops may not be level. That means irregular cuts under the cabinets, your walls out of plumb may mean angled cuts! Aside from rebuilding your whole house, compromise is key! A truly skilled artisan will produce, regardless of circumstances.
The average back splash takes one or two days to install the tile, depending on the size. We take our time with back splashes. My favorite saying is this: “A fatigued tile guy is a careless tile guy”. The one thing you don’t want your tile guy to be, is careless!
When we do a back splash, we go step by step, utilizing a tried and true system that produces quality, great looking work and a long-lasting finished product. Tile guys will decrease their price by cutting corners, working long hours and combining steps. Using ‘speed set’ is one example of how they will accomplish this. “Speed Set” is a thin set that is used to stick the tile that sets up quickly. We only use ‘speed set’ if it’s absolutely necessary and in my opinion, it is rarely necessary! Cement gets its strength from the curing process! Speed set quickens the curing process so, it’s an inferior product, in my mind.
We put each part of a back splash into multiple days because we allow for each step to dry completely. We don’t set and grout a back splash in the same day. We set tile, let the thin set completely dry according to manufacturer specifications, and then we’ll grout.
A five-day job for a conscientious installer, will be cut to two days by a blow and go guy. If you’re not picky and you just want a project to be done quickly and cheaply, that two-day guy is your candidate; but remember, tile is a PERMANENT FINISH and the Cheapest tile job is the one you only have to do ONCE!
Once all the tile is set, we’ll grout. You’ll have to determine what color you like. Pick your grout once all the tile is up, so you can compare colors in the natural light! I recommend using the highest end grout possible. People are usually unhappy with grout getting filthy. There’s an easy solution. Buy a quality grout. It costs more, but it’s denser and has built in sealer, so dirt won’t penetrate it as easily. We use a product by Custom called Prizm or, when we can, a product by Mapei called Flexcolor.
Here’s a part many tile guys skip to save money and you’ll want to have your antennae up during the recruiting phase to hear if your tile guy mentions this. We caulk all plane changes. A “plane change” is where the granite meets the tile, or in corners or under cabinets. Why do we do this? We’ve all seen the cracked grout joints between granite tops and tile splashes in many homes and businesses. That’s because it was grouted in tight and didn’t allow for the small amount of movement in the structure. Every house moves because that’s the nature of wood structures. Good installers will allow for that by using “soft joints” to compensate.

Installing ‘soft joints’ will add one more trip to your house to use high quality, silicone sealant that matches your grout. We don’t silicone the same day as the grouting because it’s best practice to allow the grout to completely dry, come back the next day, do a final buff, getting any grout dust cleaned up. The product we use is 100% silicone and not the “siliconized” stuff (JUNK!) packed with latex.

It has a slightly different shade than your grout, because one is cement and one is silicone, but it helps to make a lasting, issue free back splash. The silicone is also cleanable, so when you’re cleaning your counter tops you can scrub it without a problem. The soft joint step is usually a couple hours, but we’ll also adjust your outlet covers which can be quite a feat because of the added thickness of the tile. We have our ways!
Our tools are long gone after the setting stage, the cardboard was taken up after the grouting, so when the caulking is done, we pick up a final check and we’re out of your hair. This hypothetical back splash took about five days.
Wow, all that for a back splash. People will call me telling me about the square footage of their back splash. I always tell them; SQUARE FOOTAGE DOESN’T MATTER. Back splashes are billed based upon time. The average backsplash takes a setter and a helper 40hrs. When you get a bill for your custom, one of a kind back splash, think about the price like that; Two guys, working inside your home for 3-5 days. Plus, the cost of setting material, tile, any other business expenses as well as profit. (So, we can stay in business and do your next project.)
On average one of our back splashes will cost from $1,000-$5000. If we have to tear out an old back splash, it will certainly be over $1000.
*****************************************************************************
A few points for you to think about:
· Many counter tops have a small 4” granite splash that was installed by a granite company. That piece of vertical granite is more than likely covering a large gap between the granite top and the back wall. Framers build wavy walls and granite guys don’t cut their granite to conform to the wall. If you take that granite back splash off, there may be a large gap that the tile will not cover. If you put tile on top of that granite back splash, in my opinion, it’s not ideal. If you’re having granite put in and you KNOW you’re putting in a tile back splash, make sure the granite guys cut their granite to conform to the wall it is going up against, or you may not be able to use the tile you want, or get tile at all.

· Think about edging for your splash. Anywhere that a tile is going to end, where it’s not butted against a cabinet or another wall, you need to edge it. That may be by flipping a tile vertically, while the field is horizontal, or my preferred method is using a Kerdi profile in brush nickel, for example, to match the fixtures. A fine little detail. The raw outside edge of a tile is a quite unflattering and sloppy look!

· Back splash lighting is important. Most electricians will slam their lighting against the back wall, which is against national standards. (who’s keeping track?) When this is done you get an effect called “wall wash” where the light hits the tile back splash at an unflattering angle, accentuating every flaw. This isn’t the tile guys fault! If you’re in the planning stages, have your back-splash lighting brought out to the middle of the underside of the cabinet and this will solve the problem. CLICK HERE FOR AN ARTICLE ON THIS TOPIC!
· Think about buying new face plates for outlets and switches! New plates will look amazing! If your outlets and switches are old and worn, think about having an electrician replace them!
· Be onsite to supervise the moving of appliances. Your stove very often needs to get moved. It’s wise to be around to help, if needed and consult with the tile installers.
· Electricity may need to be shut off to the outlets on the back splash to prevent the installers from getting shocked.
· Your tile installer will also be responsible for adding electrical outlet extenders so your outlet plates go on the way they should!
· During a demolition, put things away and take things off the wall that could fall due to vibration. There is going to be a lot of hammering! Wouldn’t want to break Granna’s China!
· You want to be the person that has their counter tops completely cleared of all ‘STUFF’. Make the space ready to work in for the people who are doing your splash. Have a space that is out of the way ready to accept things like coffee pots, dish strainers, etc. Have your island cleared as well if you have one! We’re tile installers, not movers.
Be sure the wall that you are installing your back splash on is PRIMED. NO RAW DRYWALL OR DRYWALL MUD. Raw mud sucks the moisture out of the thin set so it will set up extra quickly. Quicker than you can stick tile on the wall!
NO GLUE OR COATINGS on the substrate where the back splash is being installed. This is called a “bond breaker” and your tile will only be stuck as well as the glue!
When purchasing a GLASS BACK SPLASH be sure to ask the installer about the edges of cut tile. Below I’ve posted an example of quality cuts vs. bad cuts. I’ve seen many glass splashes installed with bad cuts and I wonder how no one says anything. Glass tile takes special skills, blades and techniques to cut. Be sure the installer you are using knows what he is doing.


************************************************************************
There is a lot that goes into a back splash. They are certainly a luxury item and when you’re ready to off load your home, a nice one will sell the place for you. I always warn against shopping for back splashes based on price. We’re usually lured into accepting undesirable treatment or results because the carrot of low price was dangled in front of us. Don’t accept it! This is a permanent finish and something you’ll have to live with as long as you’re in your home. These people will be working in a FINISHED SPACE with your valuables and everything you’ve worked your whole life for. Drop the extra money to have it done beautifully and professionally.
Now that you’ve made it through this post, I sincerely believe you’re ready for anything that comes at you.
You now have the knowledge, which will be transferred into the power to realize the kitchen splash of your dreams! Good luck!

ProKnee AP16: The Ultimate Professional knee pads for tile?
In this weeks’ vlog I do my first video product review of the ProKnee AP16. I ask the question: Are these the ultimate Professional knee pads for tile?
Do yourself a favor and check out the video below!
For an extensive written review click here!

Hamilton Tile Tip of the Day: How to screw your plywood subfloor with this easy system.
Today’s Vlog post is a DIY tip to organize and systematize your plywood screwing.

Our recent tile installation in Acworth, GA puts the SERVICE in tile service.
Our latest vlog documents a master bathroom tile installation in Acworth, GA. Very excited to see this bathroom finished up. Grouting this week and it’s going to be a real master piece! Check out the video and be sure to like and subscribe to my YouTube channel.

Are lippage systems for AMATEURS and FAKERS?!
My most recent vlog is on an eternal debate within the tile community!
Discovering inspiration from a mosaic tile shower floor in Johns Creek, GA
Inspiration sometimes comes from the strangest places! It’s not often when working with tile that we get to be exhilarated by a feel good story. I was really moved to see that the tile we were using on a recent tile shower install in Johns Creek, GA was put together by some people who are being integrated into the work force by a group of non-profit organizations. These people have intellectual difficulties but are still finding fulfillment and purpose making things with their hands. This is another example of an incredibly touching exercise in humanity happening in the tile world.
The company is called Eco Ceramica and it is based in Spain. I would like to promote a great company doing excellent things in the world and being the change they wish to see.
I thought it would be neat if one of the special needs workers living across the world sees a video of the tile they made being installed in the U.S.A I bet it would fire them up and it would also make my year! This would be a great example of things coming ‘full circle’!

We're losing craftsmanship in a 'Market for Lemons' and a prescription for change.
I have no problem connecting with an informed homeowner. None.
One of the first things I want to know is, “Have you researched my company?”
I ask this because when a homeowner is in the market for remodeling, especially tile remodeling, job number one is to get INFORMED about what you want, what you’re buying and who you’re working with.
In economic terms I’m wanting to reduce ‘information asymmetry.”
Information asymmetry deals with the study of decisions in transactions where one party has more or better information than the other. I strive to level the playing field on this website so that everyone is on the same page.
If you call our company and we are just a number in your pocket, we may not be able to connect. If you want us to do work and you don’t care about HOW your project is built, it will be hard for you to see value in our product.
We have so much success with the folks WE DO work with. Everything goes swimmingly, love all around.
I’ve thought for years about why it’s so difficult to sell a quality product and service in this market.
But finally, I have (A PART) of an explanation, which I’m going to elaborate on today.
The quality of tile work and a craftsman’s ability to make a living has suffered.
For ever one tiler getting into the business, five are leaving.
A term originated by Nobel prize winning economist George Akerlof , “The market for Lemons” describes the source of our adversity very well.
The “market for lemons” according to Wikipedia:
“Examines how the quality of goods traded in a market can degrade in the presence of information asymmetry between buyers and sellers, leaving only "lemons" behind. In American slang, a lemon is a car that is found to be defective only after it has been bought.
Low prices drive away sellers of high-quality goods, leaving only lemons behind.”
Click here to read Akerlof’s paper.
This paper was written in the 1970’s and the used car market has improved and some solutions have been devised, but it still rings true in many ways in relation to tile installation or residential home remodeling, generally.
When you buy a used car ultimately you have no idea what is going on under the hood. A car can look great, but it could be a ticking time bomb. Used car dealers go through all sorts of contortions to build confidence in their buyers, that they’re buying a reliable car. A buyer is ultimately unable to tell which car is quality and which one is not.
Tile installation is the same way.
When you’re buying a shower, you have no idea what is going on under the tile. Tile may look great, but how your shower or bathroom was put together is the most important part and frankly, most homeowners have no idea about the inner workings of their bathroom remodel.
Unfortunately, used cars and tile work have received awful reputations for quality because of this information asymmetry.
Buyers simply don’t know what they’re buying.
They can’t tell the difference between a lemon and a peach.
This leads to prices getting driven down. Everyone assumes they’re buying lemons. Lemons become the norm.
I often look at tile work that people are perfectly happy with, and I think of all the improvements we could make to it. “Why didn’t they do this like this…Oh, that’s not right….” But because of an over all degradation of the trade, consumers don’t know the difference between great tile work and average.
So, what happens to the guys like us, that are selling ‘peaches’? Guys that over build things and build with quality and precision??
1. We get driven out of the business because we can’t make a living at it.
2. The quality guys adjust how they do things and build things lower quality in order to meet the market’s price point.
Gresham’s law describes tile very well. “The bad drives out the good.” The ‘race to the bottom’ makes it impossible for craftsmen to prosper.
Some say the solution to this problem is government intervention. More laws. The insurance business is an example where the information asymmetry goes in the buyer’s direction. Insurance companies don’t know what is going on with people; their health, their lifestyle, etc. So, there are laws to account for the buyers’ dishonesty.
Electricians and plumbers are licensed, that helps them regulate their market. They are required to have up to date training, but it’s not a magic bullet. This will never happen in tile.
My solution is an informed consumer.
The consumer needs to demand they be able to ‘look under the hood.’
When you’re buying tile ask to see the CARFAX.
The internet is solving the information asymmetry.
A good tile re modeler is going to have content online for people to verify what they’re getting. My website, my blog, has three years of documentation to verify that we are indeed, selling peaches. Credentials and reviews also help push the point home.
My problem is how do you make people curious? How do you convince people that all tile work is not the same? How can I convince people to pay more to get something that will last?
I recommend that folks spend a lot of time online before they buy a bathroom. Your number one tool during a bathroom remodel is your computer and an internet connection.
In tile, like in the used car business, there are ‘peaches’ and there are ‘lemons’.
Find the company that is selling peaches.
Those peaches will be priced much higher than the lemons. The only way you’ll know that you’re getting a peach is by depending on the construction companies’ content marketing and reputation.
Builders have an incredible incentive to cheapen their products and incredible amounts of opportunity to reduce quality by cutting corners in areas that you don’t see.
Just like the CARFAX report has revolutionized used cars, content marketing is revolutionizing remodeling.
Using the internet to find and vet contractors has A LONG way to go, though.
In my time speaking with 100’s of prospects, I find that around 10% will say they “researched” before they called. That number needs to be higher!
Jason thinks if people continue to get ripped off, things will change. I’m a bit more pessimistic on the subject after years of making content, but I suppose every person that decides to use us based on this concept is a person that will remember that this way worked and possibly do it AGAIN or tell a FRIEND!
Hopefully it will proliferate!🤞
Hey all! This is some big brained stuff for me so if anyone makes it this far down, tell me if this all makes sense in the comments! Am I off the mark? Do I not understand “market for lemons” TELL ME WHAT YOU THINK!
Thanks, BEN


Kennesaw, GA bathroom remodel: A stunning difference.
I open this post bathroom remodel blog post from our latest project in Kennesaw, GA with a comment on how neat it is to look over my blog. What other company can show you their last 3 years of work in this fashion? Allow me to answer that for you, not many!
Karthik and Lindsey received our number from their neighbor Bob, for whom we did a lot of tile work. Bob told them “They’re not cheap but they do a really nice job!” That’s a great description of us! Like I always say, it’s not what you pay, it’s what you get!

They had a pretty clear vision of what they wanted and we just went ahead and put it together for them. We employed our fool proof system for success and they received a show stopper!
What a great example of what makes us different. It’s a conscientiousness while we work. We’ve been there and done that! How many guys have I seen dive into this tear out carelessly with a sawzall. Can you imagine if you hire a guy like that and they hit these pipes buried in the wall? Not us. We plan for the worst and have the foresight to prevent you from having a major head ache during your bathroom remodel.

Even your garage floor gets protected while we’re working. “It’s just a garage.” Yes, that is true…But it’s not OURS so it gets treated with the level of respect that you pay winners to have. That’s my new thing, we’re winners. I look around at the men out there. We are winners. You want to hire winners.

Funny story, while packing this shower pan, the dry pack we were using to form it started hardening in ten minutes rather than the traditional eight hours! What a nightmare. Jason was about half way done with the pan when it started hardening, so we just took it all out and started again the next day. This had a compounding effect on our schedule. We lost about two days because of this, all told. We still finished on time but with a reminder of why we love foam pans! This situation is an illustration of Jason’s perfectionist nature. When you look at your bill and see it’s a little more than the next, realize it’s because things like this that are out of our control happen quite regularly. It seems to be more and more prevalent in the tile business because just like everything else…the materials we use are getting cheaper and cheaper; worse and worse quality…We roll with the punches and keep moving forward with perfection in mind.

I like to mention the innumerable ugly drains I see in pictures amongst my peers. Schluter has the sharpest drains and I’m doubtful people really notice until they go to a friends house and see the hideous ones that unscrupulous installers put in!
We’re water proofing on the OUTSIDE of the shower too!

Full coverage under large format tile is so important. It’s more than just plopping tile done and saying, “good enough.” It takes a flat substrate, it takes putting your back into it, and it takes loving care…A professionals touch. We proudly take photos of our full coverage as verification for you after the job is done. I’m still waiting to see that from our competition.

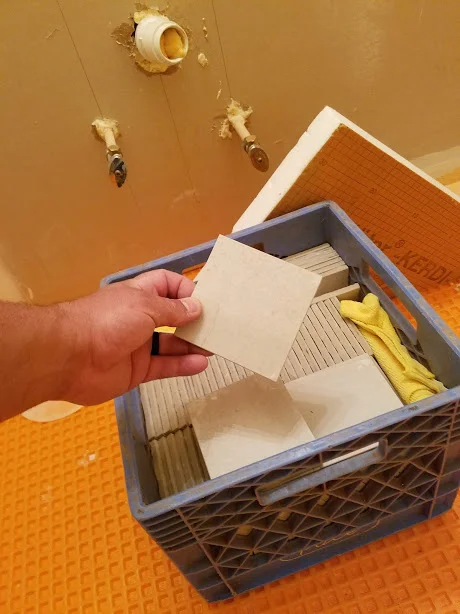
The supplier didn’t have small format tile for the shower floor available. We do small tile (at or under 4”) on the shower floor to improve footing. Jason went ahead and cut 20 square feet, and sanded all the edges. This stuff is actually better quality than anything you could buy at a tile store, but I suppose I have an attachment to these….because we MADE IT. That’s MADE IN THE USA for ya! Quite literally.
You think we’ll trust unknown granite installers to install our hard surface curbs and counter tops? I think not! They are famous for putting these things down with silicone and our question to them is what happens when water gets in between the layers? How are these supported without full thin set coverage? I’ll tell you what they say because I’ve asked them…”It doesn’t matter the glass is on top of there.” That mindset is why we don’t let granite people around our showers. They have no concept of how one is supposed to operate and the importance of using proper installation techniques. We don’t even try to tell them how to “feel”. We do us and keep them as far away from your house as possible. We live by the saying, “If you want it done right, do it yourself”.
I wanted to mention that I don’t necessarily hold anything against granite guys. They are expected to do a certain number of installs a day. So, not much time can be put into yours. You’re always better off having the tile guy handle your hard surface installs. He’s there and he cares and he probably doesn’t have 5 other stops to make that day.

Systems, yes, the implementation of systems is how we have success. One step at a time. Finish this step before you move on to the next. Each step takes as long as it takes.
This is a water proof shower. The most important part of any shower build. We talk a lot about water proofing and if you’re having tile work done this should be a major concern of whoever is constructing your bathroom.

Straight stacked tile is the way to go…Read the article here! This is a floating bench that will get a metal support bar and a water proof 12”x28” Kerdi in set box. This tile was awfully sizey but nothing Jason couldn’t handle. They were as much as a 1/16” different between each piece, which makes it extremely difficult to keep consistent grout lines.

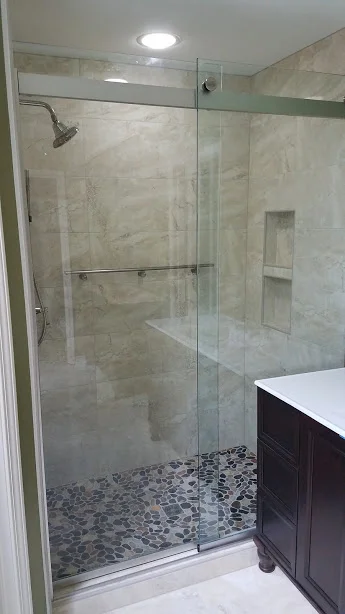
The finished product pre glass doors. This small bathroom took us two weeks to complete. Two guys, two weeks, inside your home. We are the guys you can depend on and trust. Most ‘builders’ will send strangers to your house. We are not strangers. Yes, you may trust your builder, but ask to meet the people doing the work. They are the ones that have the fate of your project and your hard earned money in their hands. What’s going on underneath is usually much more important than what you can see!
You can tell I take pride in this, just by the way I write. That’s the beauty of hiring owner operators. We put our name on this stuff, we have addresses in the community and the future of our family rides on these remodels. That’s why we take these so seriously.
At the end of the two weeks of tile installation Chattahoochee Glass Doors comes and does a template. One week later the doors arrive. Like clock work. Every. Single. Time.

The glass tile in the back of this soap niche was a very interesting look. It had the look of blue jean fabric. This box was placed perfectly in the lay out, full pieces of 12”x24” tile all the way around. This box is edged by color match Schluter profiles. They are special order from the factory, so chances are no one else will have them. Very sharp and a great way to protect the edge of the tile from damage.

That’s me! I was very happy when my Crossfit coach saw this picture and told me my arms were looking big! I said, “Thanks to your help!” Unfortunately, as my wife’s pregnant belly grows, mine seems to be doing the same thing! My only fitness goal has been staying in an extra large shirt! Small goals for now!

There was a small back splash on the vanity that had to meet up and be flush with the outside 12”x24” tile. When this happens we’re dealing with different thicknesses so we mount the thinner glass on Kerdi fabric so we can build the smaller tile out to the level of the thicker tile on the outside. Time consuming technique but a very effective one for ‘detail oriented’ tile guys. That’s us!
We also did a pattern tile laundry floor. I really love pattern tile. I can’t wait to build a shower with it!

The finished product! This thing looks great and it’s built to last.
So, you’re here. You’re looking for re modelers. You’ve found your guys. You’ve found a company that will have your best interest in mind, that will build something that will last and function as it should; that will go above and beyond, that are experts in their field and are at the TOP of their field; we’ll call you back and show up when we say we will and do the things we say we will…We have all the qualities that people say they want in a remodeling company...and we would like to connect with you. We want to be your unicorn. If you’ve read this far you ‘get it’! These people ‘got it’ and we are so blessed and appreciative to have been their unicorn!

Finally, the Five Star Google review. I can speak all the golden language and I can sure spin a yarn! But, as the grande finale, allow me to let me our happy client to do the talking for me. I’m particularly proud of the shout out to my web site and blog! It’s why I do this, it’s for my people!

Neesha (I hope I didn’t miss the spelling) Great, sweet dog! We are dog people. If you have dogs, not to worry, we are well versed in the ways of animals!


Check out my two recent guest posts!
I had a lot of fun putting together a couple pieces of content for the NTCA (National Tile Contractors Association) and the DIY Tile Guy.
My NTCA (National Tile Contractors Association) blog post is titled, “10 tips for a tile apprentice to get to the top”. On this one I thought I’d write out some hard fought lessons I’ve learned through out my journey as a tile guy. I’m hopeful these pointers will be useful to a young person starting out in the tile business.
Click Here to read my National Tile Contractors Association Article.

I made this video and blog post for the DIY Tile Guy. I have liked his website for a very long time. I’m thrilled to have contributed and it was really exciting to have the opportunity to put this together.. My tip will be invaluable to a Do-it-yourselfer.
His blog contains a load of great information and will be helpful and informative to a homeowner and DIY person alike. If you care about how your project is built, his site is a great resource to figure out how things are supposed to be done!
Check out his excellent blog at DIYTILEGUY.com

Have a look at my tile tip video!
Four reasons we recommend a straight stacked tile pattern.
Making a decision about the lay out of your tile can be a very difficult one. Almost as difficult as actually choosing the tile!
Designers and homeowners are usually aesthetically minded, but as installers we think of tile lay out in a completely different way, which I’m writing about in today’s blog post.
In a perfect situation, the designer/homeowner collaborates with the tile guy and takes their perspective seriously. They’ll mix their worldviews to produce something that looks, functions AND lasts. This doesn’t always happen because lay out is often mistakenly seen as not making a difference to the over all finish. The fact is, lay out is quite important in relation to the finished product.
So important, that manufacturers will label their products to inform the installer on how to put it in. Labels like this one generally shouldn’t be ignored:
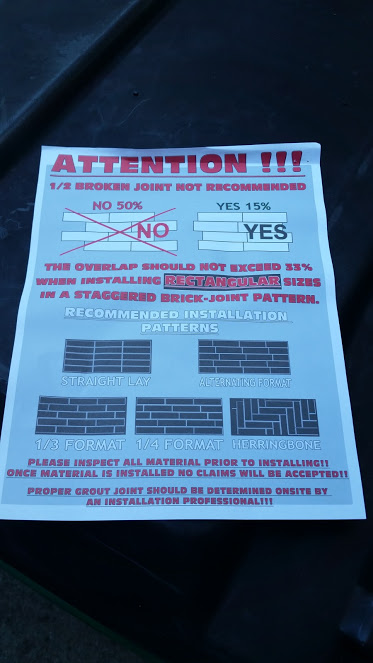
Be sure to check manufacturer recommendation before installing your new tile. PRO TIP: I can tell if the tile I have is from a legitimate, upstanding manufacturer based on whether or not they have installation recommendations on the boxes of tile.
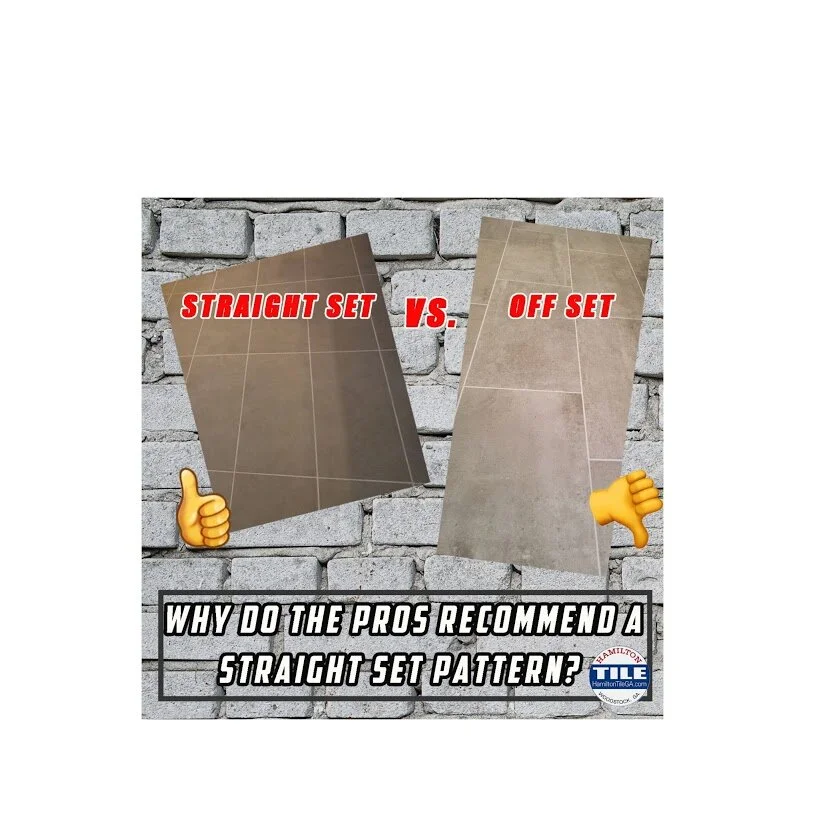
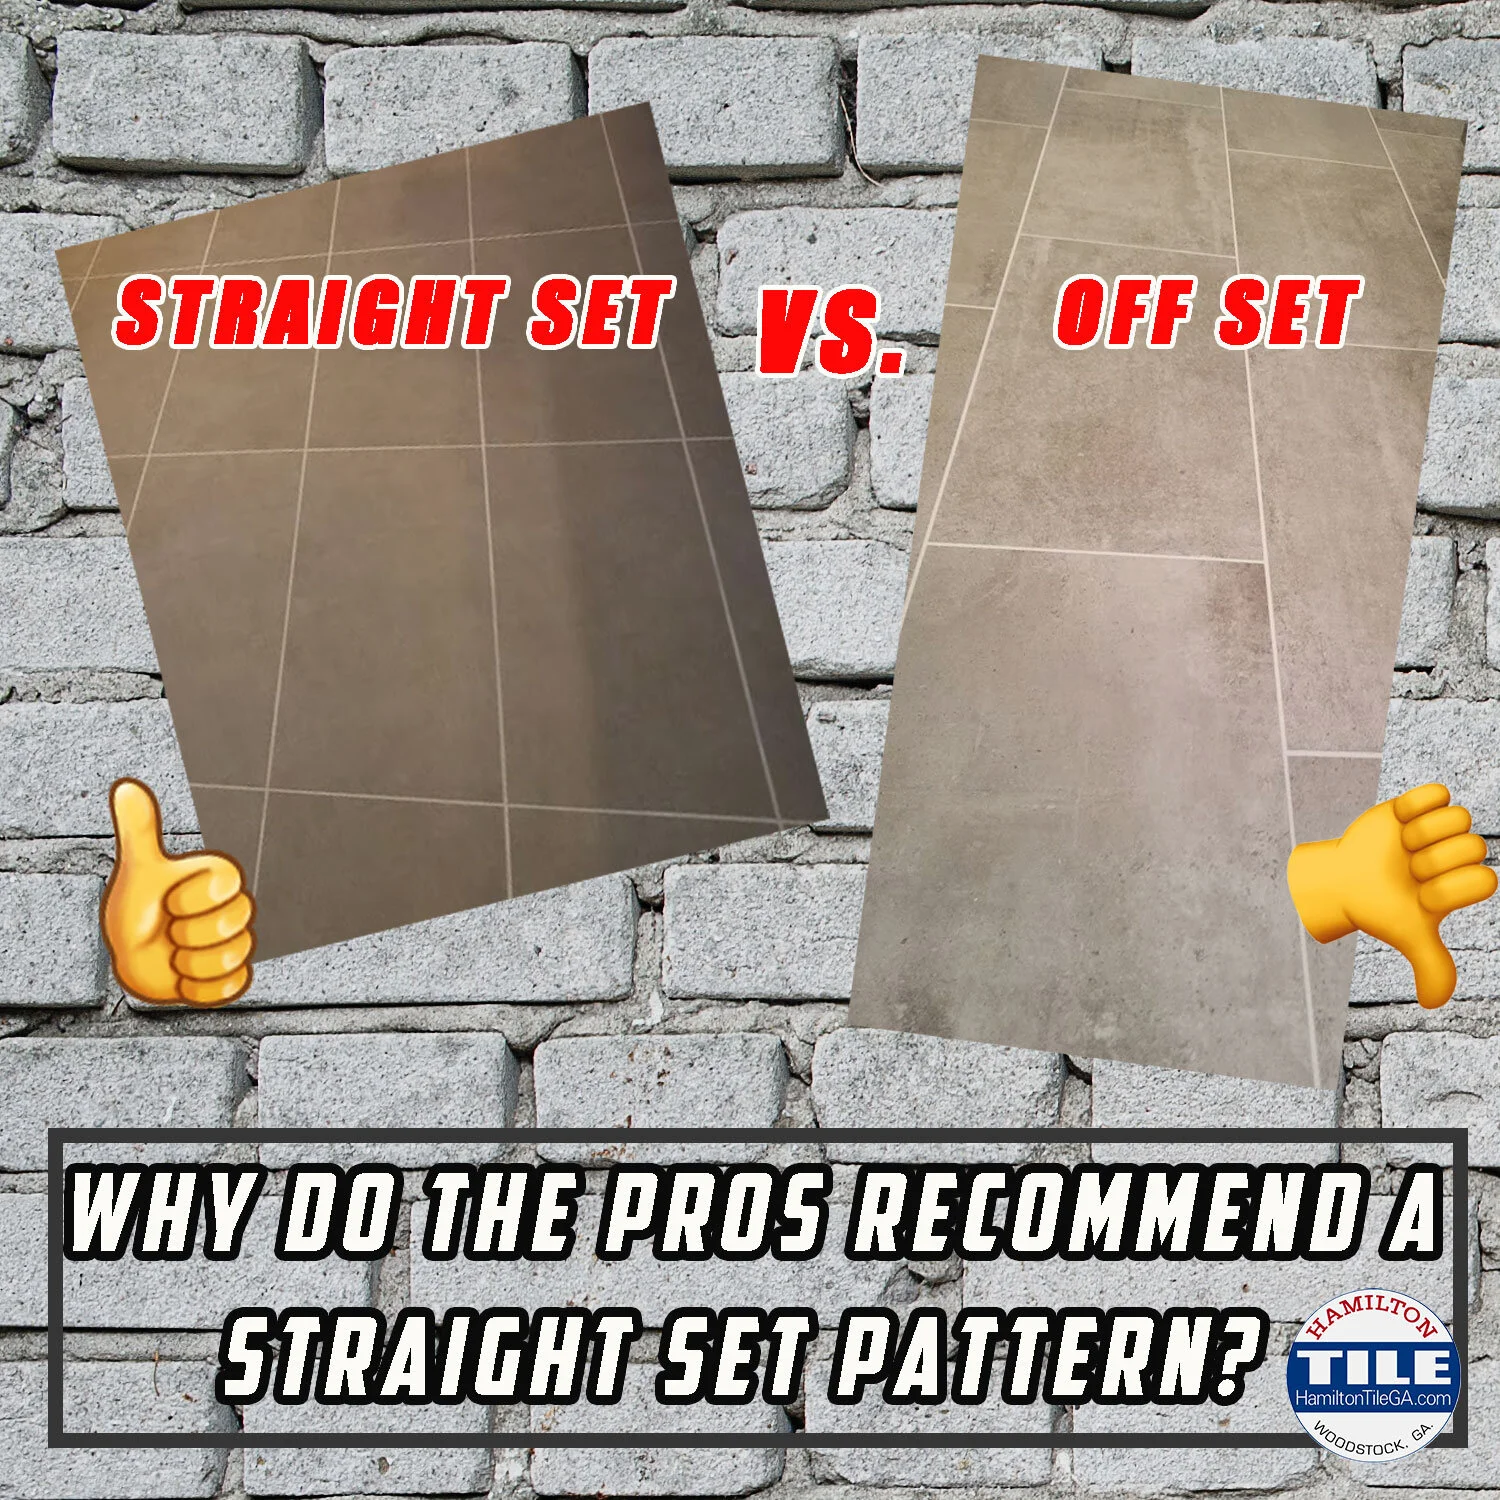
Below are the two most common tile patterns, and many of the other patterns are variations of “brick set” or “offset” lay outs.
The question:
Why do we consistently recommend a straight pattern over an offset pattern?
Here are my four reasons:
Less potential for small pieces
As a tile installer there is nothing more unsightly than small pieces of tile. As CTI certified installers, our training advises us to never have any piece smaller than a half, but when we are doing large projects with patterns that are supposed to ‘mirror’ or ‘wrap’ sometimes it’s impossible.
“But Ben, just shift the pattern.” Easy for you to say! Like I haven’t thought of that! :P
When shifting a pattern to try to reduce the instance of small pieces, the small piece will manifest itself somewhere else! Frustrating!
In a perfect world, the space you will be tiling is designed and built to accommodate the tile size and pattern. I’m talking about some EXTREME planning. It never happens like that.
When we’re putting in a ‘straight set’ pattern, we really have more flexibility in minimizing any small pieces on the project. Below is a perfect example of what I am talking about:

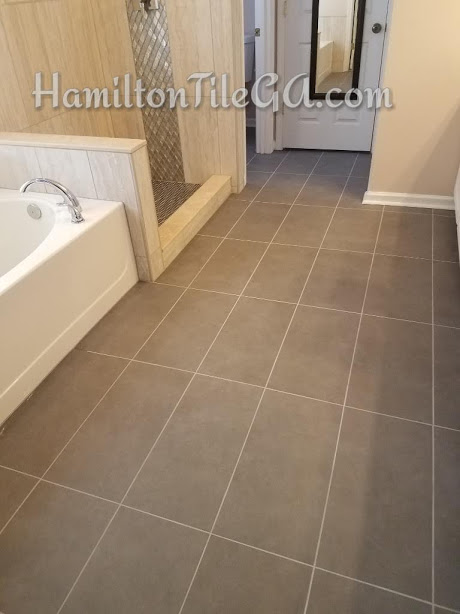
Nothing bugs an installer more than small pieces. But with a bathroom like this, with tile wrapped around the entire space (wainscoting) if you shift the pattern to make bigger pieces in one area, the problem of a small piece manifests itself somewhere else! Problem solves itself with a straight set pattern!
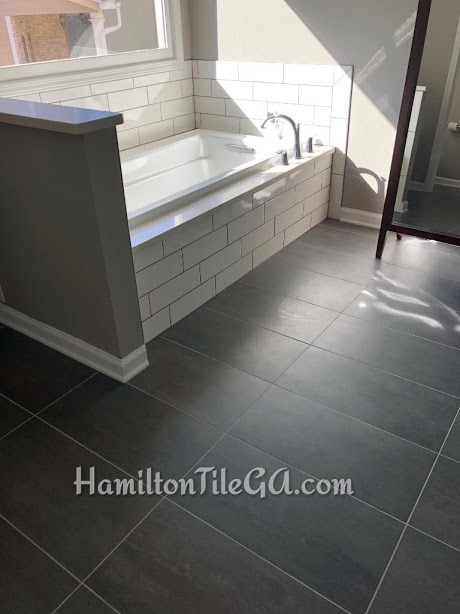
Compare the picture above to this ‘straight set’ bathroom below. Same size tile. Same bathroom lay out with wainscoting. There wasn’t a small cut in this entire bathroom. Full pieces in the corners. Full pieces around the inset box.

2. Less wasted tile.
Most tile jobs require about 20% waste. Unless we’re doing an offset pattern, we’ll get significantly more so we don’t fall short. The first bathroom with the horizontal offset pattern above, we had practically no leftover tile at the end of the job. We had to strategically use every tile. As a homeowner you may think that is great, but for a tile installer it is a nerve racking experience, and not having enough tile has the possibility of throwing the schedule of a job way off.
The straight set tile job from the photos above had plenty of extra with no danger of falling short. Why?
When an installer is doing an offset pattern sometimes a large portion of cut tile cannot be used anywhere else. That increases the waste considerably.
3. 'Straight set’ is a more contemporary look.
When I look at installer photos from across the pond I see the Europeans doing more ‘straight set’. What I notice when installing tile, there is definitely a generation gap between the people who want an ‘offset pattern’ and those that want a ‘straight pattern’. A ‘straight pattern’ will automatically make your space seem more modern, whereas an ‘offset pattern’ will make your space more traditional. Looking to be young and hip? Go straight set.
And most importantly:
4. ‘Straight set” is more likely to produce a flatter finish.
All porcelain tile is slightly warped. No size has a more pronounced warp than a 12”x24” porcelain tile. They are the main offender. Look around at any commercial space and you’ll see brick set 12x24” that look horrendous. That’s the reason most manufacturers don’t recommend brick set with that size tile. When you brick set a tile of that size, the middle is warped up and the edges are warped down, so where three tile come together there will be lips. An example below, you can see the lips clearly:

There are ways to alleviate some of these issues, but straight setting is the most straight forward.
Some of the lippage problem can be taken care of with leveling systems, like Lev-Tech or MLT but they are not a fix all. Leveling systems add another level of technicality to any install. Cost aware people should think ‘straight set’!

The built in warpage of tile is the number one issue with the material. The higher quality tile has less warp, but every tile has some.
These two floors could not be done in an ‘offset pattern’ Even a 1/3rd offset was proving to be problematic.
Let me rephrase that, these floors could have been done with an offset pattern, but they would have had unsightly lips. “Just be a better tile installer!” Ultimately, we are only as good as the material provided.
We spoke to the customer and straight stacked the floor and they both came out perfectly flat, because instead of the warps working against each other, we configured them in a lay out so that the warped tile worked with each other.
A flat, lip free install took precedence over an arbitrary aesthetic preference, as it should.
The moral of the story is that you increase your probability for success by conferencing with your installer prior to installation and seeing what the best option for lay out will be. I’m a big fan of mock-ups. Have a mock up done for comparison and make a decision from the perspective of ‘this tile is forever’. Be open to change, based on the limitations of the material.
